Showing posts with label crafts. Show all posts

Friday, August 5, 2016

Chalk Rocks: An All-Natural Art Craft


Kid’s Art: Rock Chalk Designs


Are you planning to do a rock study this year? We’ll if you are save this activity for when you finish. It’s a lot of fun and it will give your students a relaxed environment to talk about the observations they make about rocks together.


The Preparation Stage…

Go on a Rock Hunt


Grab a bucket and head out to the woods or a rocky creek bed or anywhere you might find some pretty big rocks. You don’t want your child picking up anything that is going to injure their back lifting it or their foot dropping it, but something about the size of a man’s fist is good. Grab a few if there are plenty available. We had a good time looking for just the right size rocks. We compared the sizes of all the rocks we saw. We talked about their weight as we picked them up… or tried to. We talked about how some were stuck in the ground and why/how that happens sometimes.

Cleaning Rocks


We had a lot of fun with this part of the activity as in we made a really big mud mess! I gave my kids a tub of water and some paintbrushes to wash the rocks off. They had a good time flinging mud sprinkles as they scrubbed away at their rocks. It was fun for me to listen to their conversations about the rocks during this time. One would say, “Look! I found a shiny spot.” While the other child would point out that he found one with black speckles. Once we got all the mud and dirt off of the rocks and onto our clothes, we set the rocks out to dry. If you’re not into letting your kids get dirty, wearing old clothes or a smock would be a good idea.

The Designing Stage…

Rock Chalk Designs


Once the rocks were dry, with chalk in one hand and a rock in the other, my kids started decorating. Lily Anne loves pink, so here rocks were pick by design. Caleb tried to draw trucks and tractors on his rocks, but in the end decided to color them in.

Using chalk paint would also be a fun way to decorate rocks.

The best part about this activity is that we can enjoy the beauty of our art word, but that the rocks can be returned to nature undisturbed. I especially enjoy find artistic ways my kids can express themselves without using a medium that takes up space in our limited space RV. Taking a picture helps us keep the fun memories and the beautiful designs in our hearts.


I hope your children enjoy getting creative with rocks too! I’d love to hear how they went! Feel free to let me know in the comments below or find me on Facebook or Twitter! I always love to hear from my readers!


God Bless You on Your Learning Journey ~


Wednesday, October 14, 2015

Five Pumpkin Seed Learning Activities

http://rvclassroom.blogspot.com/2015/10/five-pumpkin-seed-learning-activities.html


One of the best manipulatives for October is pumpkin seeds. There are so many things you can do with them. We had a great time with these five activities, but there’s so much more you can do with pumpkin seeds!


http://rvclassroom.blogspot.com/2015/10/five-pumpkin-seed-learning-activities.html


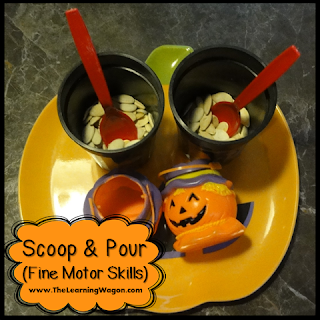
Scoop and Pour (Fine Motor)
Materials:
Pumpkin Seeds
Plastic Cups
Small Plastic Halloween Baskets
Plate
Spoon

Set-Up:
1. Place a cup, small plastic Halloween basket, and spoon on the plate.

2. Pour pumpkin seeds in the cup. There should be enough pumpkin seeds to fill the basket without overflowing.

http://rvclassroom.blogspot.com/2015/10/five-pumpkin-seed-learning-activities.html

Directions:
1. Have your child use the spoon to scoop pumpkin seeds from the cup and pour them out in the small Halloween basket until the cup is empty.

2. When finished, have your child pour the pumpkin seeds from the basket back into the cup so he can begin again.

http://rvclassroom.blogspot.com/2015/10/five-pumpkin-seed-learning-activities.html

Making Letters or Words
Materials:
Pumpkin Seeds
Plate or Bowl
Letter or Word Cards

Set-Up:
1. Place a large letter or word card in from of your child.

2. Provide your child with pumpkin seeds in a plate or bowl.

Directions:
1. Have your child pick up one pumpkin seed at a time and place it on the letter or word provided to practice the shape of the letter or word he is creating.

Lily practiced writing her name with pumpkin seeds while Caleb practice some –at family words he has been practicing.

2. (Optional) You could have your child glue the pumpkin seeds to the letters to create a fun craft, but we just like putting them on and taking them all for continuous fun!

http://rvclassroom.blogspot.com/2015/10/five-pumpkin-seed-learning-activities.html


Pumpkin Seed Points
Materials:
Pumpkin Seeds
2 Plate or Bowl
Skill Flash Cards
1 Die

Set-Up:
1. Place pumpkin seeds in a plate or bowl.

2. Provide your child with a second plate or bowl to hold the pumpkin seed points he earns.

Directions:
1. Show your child a flashcard. Caleb is practicing reading short a words, so these were the flashcards he was shown, but any skill can be practiced by using addition or subtraction flashcards, dates in history, science vocabulary, and more!

2. Once your child provides a correct answer to the flashcard, he can roll the die, identify the number shown, and count out that many pumpkin seeds to put on his plate. These are his points. You may want to create a goal of earning 30 points to end the game or if you’re playing with multiple children, you can set a time limit for the game and see who has the most when time is up.

http://rvclassroom.blogspot.com/2015/10/five-pumpkin-seed-learning-activities.html

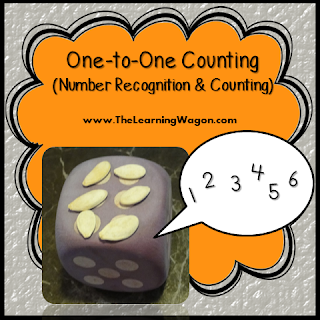
One-to-One Counting
Materials:
Pumpkin Seeds
Plate or Bowl
Die

Set-Up:
1. Provide your child with pumpkin seeds in a plate or bowl and the die.

Directions:
1. Have your child roll the die and count how many dots. Then, have your child count out the same number of pumpkin seeds.

2. You can have your child match up the pumpkin seeds to the dots on the die if you use a large one. I got mine from the Dollar Tree.

https://www.teacherspayteachers.copinm/Product/Monthly-Themed-Counting-Centers-1573073


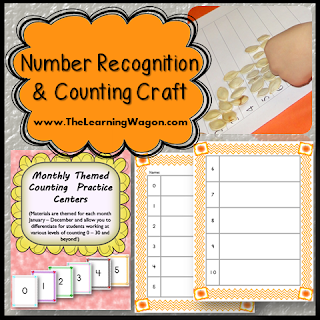
Number Recognition & Counting Craft
Materials:
Pumpkin Seeds
Glue

Set-Up:
1. Provide your child with pumpkin seeds in a plate or bowl and glue.

2. Provide your child with printable pages from
Monthly Counting Practice Printables.

Directions:
1. Have your child identify the number at the top of the page and glue that many pumpkin seeds to the paper.

This is great for children to see how numbers grow by one!

Have you tried any activities like these? How did it go? I’d love to hear your experiences and any other fun ideas you’ve done with pumpkin seeds!

Keep coming back! I have more ideas to share!

God Bless Your Learning Journey ~

 If you liked these activities, you may also like Observation Journal (Pumpkin Studies)!

Parties I've Linked Up to...
Chaotic Bliss Homeschooling

Monday, June 29, 2015

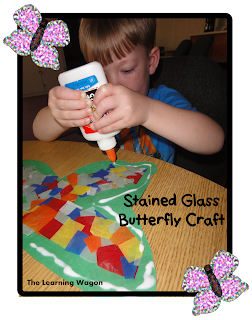
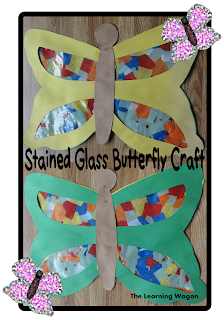
Stained Glass Butterfly Craft

It's time to share a craft. My kids love butterflies and I'm sure yours do too! Who doesn't? We chase them, observe them on flowers, draw them, paint them, and today we crafted a beautiful butterfly together.


http://rvclassroom.blogspot.com/2015/06/stained-glass-butterfly-craft.html


Supplies you'll need...

1. Construction Paper - You'll need 2 sheets of 9" X 12" construction paper to make the butterfly. Your children my choose the same color or two different colors. Caleb's favorite color is green, so he chooses green for everything and yellow is one of the colors Lily's good at identifying, so those were the colors they chose. You'll also need a sheet of brown paper to make the head and body of the butterfly.

2. Scissors

3. Glue

4. Scotch Tape 

5. Shipping Tape

6. Cut Tissue Paper Squares


How to put it together...

1. Place the two sheets of colored construction paper on top of each other and fold them in half at the same time. Use your scissors to cut out wings on one side of the butterfly so that when it opens, you will have symmetrical left and right side wings. While folded, cut out decorative shapes on the butterfly, but the shapes must be no bigger/thicker than the shipping tape. I cut out lines across the top and bottom of the butterfly, but you may cut out small circles, hearts, or any other shape of your choosing.

2. Fold the brown construction paper in half and cut out the shape of the butterfly's body and head so that you end up with two pieces.

3. Tear a strip of shipping tape that is about a foot long. Fold back the ends of the tape and place them on a table in front of your child so that the sticky side faces up.
http://rvclassroom.blogspot.com/2015/06/stained-glass-butterfly-craft.html 

4. Provide your child with cut tissue squares. Older children and strengthen finger muscles by tearing their own tissue squares. Have them children fill the sticky side of the shipping tape with colored tissue paper so that little to no stickiness remains. 

5. Pull off another strip of shipping tape equal in size to the first and cover the tissue paper so that it has a laminated affect.

6. Cut the laminated tissue paper strip to match the designs you created in the butterfly. Have your child secure the laminated strip down using Scotch tape. 

http://rvclassroom.blogspot.com/2015/06/stained-glass-butterfly-craft.html


7. Have your child place glue all around the construction paper edge. There should be no glue placed on the laminated tissue paper areas.


http://rvclassroom.blogspot.com/2015/06/stained-glass-butterfly-craft.html


8. Match up the second construction paper butterfly on top of the glue. 

9. Have your child draw a straight line down the middle of the butterfly using glue. Attach the head and body of the butterfly to this area.

10. Flip the butterfly over and have your child place another straight line of glue down the middle of the butterfly plus the head and bottom of the butterfly from the other side. Match up the second head and body on top of this area. Then, let dry.


http://rvclassroom.blogspot.com/2015/06/stained-glass-butterfly-craft.html


11. Hang up for a beautiful affect on a window!

Enjoy!

God Bless Your Learning Journey,

http://rvclassroom.blogspot.com/2015/06/stained-glass-butterfly-craft.html


Wednesday, October 15, 2014

Rainy Day Learning Fun

http://rvclassroom.blogspot.com/2014/10/rainy-day-learning-fun.html 
We’re on the road… work related. The Chicken Whisperer is speaking at the Sunbelt Ag Expo inMoultrie, GA. It’s the largest Farm show in the nation! We’ve been looking forward to attending this show for a couple of months because Caleb LOVES tractors… our whole family LOVES tractors! They have an antique tractor parade scheduled EVERY DAY!

Today is the first day of the event. We arrived yesterday with our RV and were guided to park in a grassy field where we have water and electric hook-ups, but no sewer (Ugh!). The storms were set to arrive early this morning and… they did. Rain… Rain… More Rain… Thunder & Lightening… and More Rain…

The grassy field is now a soggy mess. Andy had to walk through the rain and soggy, muddy ground toting his materials all dressed in his Chicken Whisperer garb to have 2 out of 3 of his presentation canceled due to bad weather heading our way. They say, “The third times a charm…” and it was with about 45 in attendance. With this nasty weather… that equals about 450! 

Caleb, Lily Anne, and I tried to make the best out of our day stuck inside the camper. Let me just paint a picture for you… A 3 year old and a 1 year old inside a 24' travel trailer with no slides. Let me make that a little clearer… When you take away beds, bathroom, closet, and kitchen, you are left with floor space. How much floor space? Without drawing a specified diagram, just picture a 3' x 12' area. Normally, I don’t take down Lily Anne’s pack & play bed which is over the dining table, but today I did. We needed a table. We needed more room. We STILL needed MORE, but we made do and we’re all still here! 

I knew the most important thing to do to keep them ME from going crazy, was to keep them busy… very busy! Below is a list of the rainy day fun we had.

The first activity was inspired completely by my 3 year old. As Daddy was leaving he said, “Let’s make rain.” I have no idea what he actually meant by that, but to me it meant: CRAFT! I pulled out some light blue construction paper and tore off a skinny strip for each kid. Their job was to tear it into as many small pieces as they could. I cut out the umbrella and then Caleb said we needed lightning and thunder too. I told him I could make lightning, but thunder was just a sound we would have to make. I helped them put glue on their umbrella and lightning bolts and let them place them on their paper. Then, together we made glue dots all around. They placed a “rain drop” on each dot. I added their names and hung them up. I love decorating the RV with their art work!

http://rvclassroom.blogspot.com/2014/10/rainy-day-learning-fun.html
Caleb saw me use a marker to write their names on their papers and asked if he could color with markers. I said, “Of course!” Letting them draw there stormy scenes while I cleaned up was perfect! It was a great time for Caleb to work on his vocabulary terms as he talked about the lightning flashing and the thunder rumbling, but it also helps him to work through his fears of storms.


http://rvclassroom.blogspot.com/2014/10/rainy-day-learning-fun.html


For the next activity, I read the book, It Looked Like Spilt Milk, by Charles G. Shaw. Caleb LOVED it! He thought it was so funny! I had this activity planned in advance, because we had been checking the radar and knew what to expect with the weather. I packed some di-cut vehicle shapes and let the kids pick out the one they wanted to turn into a cloud. I learned 2 things doing this activity. 

#1 – The di-cuts should have been smaller. Lily lost interest early on and just played with the cotton balls. (Hey, a little sensory fun for her is fine!) Caleb was only interested if I was doing it with him. Also, since they were so big, there wasn’t much space to write the phrase coined from the book, “It looked like a ____, but it wasn’t a _______.”

#2 – Lily’s boat was light blue so it blended better with the paper versus Caleb’s bright red train that you can still see through the cotton balls. 

http://rvclassroom.blogspot.com/2014/10/rainy-day-learning-fun.html


From there, Caleb enjoyed blowing a cotton ball back and forth on the floor. This would have also made a fun game. We could have created goals and scored points by blowing the cotton balls to them, but we didn’t get that creative at the time.

http://rvclassroom.blogspot.com/2014/10/rainy-day-learning-fun.html


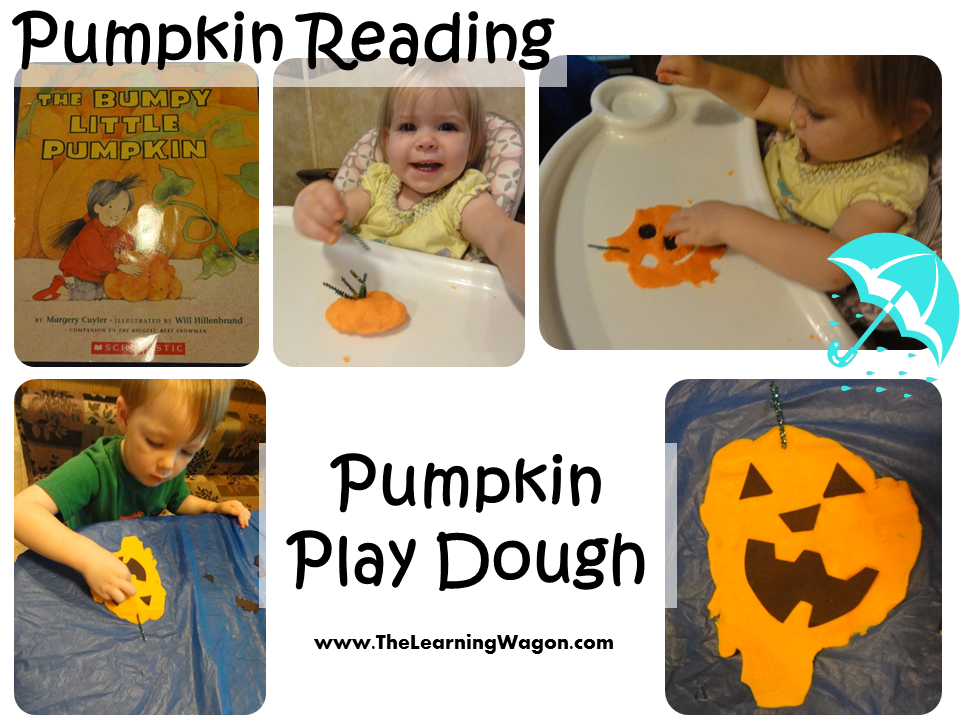
For the next set of activities, I read one of my favorite Halloween books, The Bumpy Little Pumpkin, by Margery Cuyler. I gave the kids orange play dough to create pumpkins with while I cut out shapes of black construction paper to design faces. For Lily, I flattened her dough and made the face. Then, I took a piece of pipe cleaner that we used as the pumpkin stem to cut out the shapes creating a puzzle effect. I then encouraged her to put the shapes in the holes. Caleb, used a variety of shapes making different kinds of faces and then changing them again and again. When Lily was done with her puzzle, I rolled the dough into a ball and she put the stem in the top and pulled it out several times. I saw an opportunity of interest and took it! I cut several more pipe cleaners and gave them to her. She enjoyed sticking them all in the top and taking them out and repeating several times. When he was finished, Caleb pulled out the letter cookie cutters for his name. We talked about what letters were in his name, which letter when first, next, and so on. I mixed all the letters up and he had fun finding the letters and putting them in order to spell his name! I'm so proud of his motivation to learn!
http://rvclassroom.blogspot.com/2014/10/rainy-day-learning-fun.html 
After nap, the natives were getting restless. I knew I needed to get them moving, but without breaking things. I saw in my bag of goodies, I had some balloons of various sizes. I decided to go with the smallest, what would normally be used as water balloons. I blew up a few of them and gave them to the kids. Normally, I don’t let Caleb throw things in the camper because he’s 3 so his aim is non-existent even if he tries to aim, which is not usually. He just likes to throw things up in the air and HARD! In the camper, things have come down into the sink full of water and even the stove while cooking! These balloons were perfect though… no matter how hard he threw it, they barely went anywhere! We will definitely do this more often. Lily Anne popped a few, but she got the hang of it and held on to the last one for the rest of the day.
 
http://rvclassroom.blogspot.com/2014/10/rainy-day-learning-fun.html


Around this time, Daddy got back from his last presentation and since it wasn’t raining anymore, we decided to brave the soggy, muddy, slosh outside our camper and enjoy some much needed fresh air. The kids wanted to take their balloons, so I twisted some pipe cleaner around the knot of the balloon and let them carry them around the Expo. We saw gobs of tractors, climbed on a few, saw mammoth silos, and grabbed a homemade treat. The kids still had their balloons when we got back, so after dinner, we tossed them to each other for a while. Right before bed time, I had the kids put the balloons on a stool and sit on them to pop them. They thought this was hilarious and wanted to do it again and again. I will definitely remember this in the future!

http://rvclassroom.blogspot.com/2014/10/rainy-day-learning-fun.html

http://rvclassroom.blogspot.com/2014/10/rainy-day-learning-fun.html


Tomorrow is supposed to be nice! We’re looking forward to being outside… A LOT!

What are some of your fun rainy day activities you've enjoyed while confined to a small area? Please share them in the comments! I’d love to hear from you!

God Bless Your Learning Journey!


I've Linked This Post...
Related Posts Plugin for WordPress, Blogger...