Monday, December 8, 2014

On The Road Again: Florida Bound 2014


After a few delays, we left the homestead on Tuesday, November 18th and headed up to Horseshoe Trails in the North Georgia Mountains. It's located close to Pop, Andy's dad, so we got to enjoy family time for a few days with him and even cooked a small Thanksgiving dinner to enjoy together.

From there, we headed a little further south to Cumming, GA where many of my family live. We enjoyed spending time with each other. I especially enjoyed relaxing in the hot tub, just me and my sister. I also got to see my Mom and Dad's new house.

We are truly blessed to have our family and be with them. We had a great time with everyone and didn't want to leave, but at the same time we were itching to get to our destination in Florida to begin our winter of warmth and fun! Georgia was quite cold on Thanksgiving week. We headed out Saturday, November 29th and had planned to drive half way and finish the trip the following day, but once we got in the truck and got going we were on a mission!


Ten and a half hours later, at a respectable time of 8:30pm (not too late for putting the kids to bed), we arrived and were so excited. First thing, we took a walk around the park to stretch our legs, get the kids some exercise and visit some of our old friends we had met last year!


We've been here for about a week now, but it feels like we never left. We got our setup completed (for the most part) and we jumped right into our pattern from last year of playing games, water aerobics, riding our bikes together, and visiting the local Children's Museum for Tot Time on Tuesday. We're excited that there's a new family here this year with 2 girls ages 7 and 8 and a little boy that's 4 years old. The girls have adopted Lily and our boys are having fun together being boys!

We also bought a Christmas Tree and had a great time decorating it together!


God Bless your Learning Journey - 


Thursday, November 6, 2014

Sew what have we been up to?


We’ve been home for about 3 weeks now. There is a lot to do in order to get ready for our next trip (Family for Thanksgiving and then to Florida for the winter)! One of the things on my list is to sew some new clothes for the kids, especially Lily Anne since she has about outgrown all her clothes. I haven’t sewn for years… YEARS! So, I’m making my way through with sea legs, but so far I’ve made 7 pillowcase dresses, 1 matching pillowcase dress for her cabbage patch baby, 2 pairs of pants to match her pillowcase dress, 1 pair of capris and 2 pair of shorts. Oh and I almost forgot the designed by me, tank top! The best part about this is that so far I have made all of these for FREE!


I already had on hand a good bit of cotton patterned fabric and it’s at least 5 years old, but it some of it may be 15 years old! Since this is the case, I can not tell you the names of the fabric that I used in each piece. In addition, I have been storing several boxes of clothes that I don’t wear any longer for a future yard sale. I rummaged through these boxes for some good fabric like jeans, khakis, tee shirts, etc. I even found a pattern that used the baby blankets to make PJs so I pulled those out as well. When I organized my sewing station, I found that I have a lifetime worth of thread, safety pins, straight pins, bobbins, and snaps. I had a good start of ribbons, elastic, and buttons too.


I did make two purchases initially. We never iron… EVER! The past iron and ironing board that never got used was sold at a previous yard sale, so I had to buy a new iron and ironing board since it helps to have unwrinkled fabric when cutting as well as pressed hems before sewing.
 
Okay... Okay... Recently, I did purchased less than $20 in supplies at Walmart where I bought some elastic, heat n bond (for applique), and ribbon. Some of the ribbon was on Clearance! YAY! But that's all... For now...


Where did I find these patterns? I think I’ve PINNED all the ones I’ve made so far as well as more I want to make in the future so you can find them HERE.

You just can't go wrong with a pillowcase dress. I made two styles. The first one shown in the picture just below where I have a bow on each side 


And here you can see it on my little model along with her matching flair pants.


The second style, I made the ribbon go through the opening over one shoulder and back around so there is only one bow to tie as seen in the picture below. 


And here's another example...  


You can never have too many pillowcase dresses! Here's another one with matching flair pants too!


Here's the first pair of shorts I made. They have a flap over the top with a snap.


Using the pants I'm wearing in this picture from a few years ago (NO, I am not pregnant again!), I made the next pair of shorts and flair Capri pants. I also harvested the elastic in the waist band, 3 buttons, and the zipper!


Using the buttons from the above pants, I created this designed by me tank top. I sewed the body similar to a pillowcase dress, but without leaving space for the arm holes and it's shorter. I then sewed 2 straps. I stitched them together in the back and the buttons are actually just decorating as I hand sewed snaps to the opposite side. The L is my first attempt at applique and I think it turned out pretty good. I can't wait to do more! It was pretty easy except for the fact that even though I needed to create a backwards image initially, I got so wrapped up in what I was doing I forgot, so I had to do it twice.


My goal for making all these items for Lily is so she can play in them. They're going to get scuffed up and dirty. She's a rough and tumble kind of girl. I do want them to last (at least until she grows out of them) so I'll let you know how that goes, but so far I'm happy with what I'm making. It's the right price anyway!  While it does take me some time to finish each clothing item, it's because I'm a little rusty. Once I get the hang of it, these patterns are pretty simple and will look good on her for years to come.

I’m still sewing away as I have about 1 week before we hit the road again. I still haven’t decided if I want to take my sewing stuff with me on the road. Part of me wants to because I’ve had so much fun with it lately, but part of me knows that once we get down to Florida, we will be so busy it will never come out of storage and just get in the way, so my goal is to make as much as I can before we leave, but I also have other things on my list like getting our homeschool stuff together, repacking the camper with… well.. EVERYTHING and all while juggling 2 adorable, energetic bundles of joy!


HAPPY FALL Y’ALL!


God Bless Your Learning Journey ~


Friday, October 31, 2014

In the Spotlight!


Something FABULOUS has just happened and I HAD to share it with you because I am sooooo excited and honored!

Recently, TeacherspayTeachers.com (TpT), where I sell my quality work materials for You, and You, and You, asked homeschool / roadschool sellers to share their thoughts on the kinds of resources that support, enrich, and enhance the homeschool / roadschool environment. 

To be honest, I didn't even know this thread existed in the the TpT forum. If it were not for the wonderful Tami from Kamp Kindergarten to mention my name, I would have never known! I got an email request from the TpT editor to comment about this topic, which made me feel special!

I shared my thoughts and that was that...

Or so I thought...

I received a Facebook message from Tami just a few minutes ago telling me to check out the link, so I did...

http://blog.teacherspayteachers.com/homeschooling-on-tpt/


And you can too by clicking the picture above once you finish reading my post of course!

As I read, not too far into the post, I read my own comment! MY OWN COMMENT!!!  WOW! ME! 

http://blog.teacherspayteachers.com/homeschooling-on-tpt/


Of course it wasn't all I wrote, but I'm very excited and honored to have been chosen from the hundreds of other comments that were posted in that forum to be features on the TpT Blog! 

And, if you scroll just below were my comment is posted on the blog, you will see Kamp Kindergarten (Tami's) comment with a rocking shout out to roadschoolers! 

I think it is pretty cool that homeschooling and especially roadschooling is gaining so much acceptance these days even TeacherspayTeachers.com is taking the time to notice, support these folks (us), and get the word out about alternative ways to educate children! 

Way to Go TeacherspayTeachers!

OK... Now you can click the link above or HERE and read the blog post! Enjoy!

Have a Blessed Learning Journey ~


Monday, October 27, 2014

Spooky Craft-ivity Decorations

http://rvclassroom.blogspot.com/2014/10/spooky-craft-ivity-decorations.html 
Halloween is just around the corner and I am always waiting until the last minute to decorate, but I wanted to share with you some cute, EASY crafty decorations you children or students would love to make to help you decorate you classroom, home, or even RV! 

The best part about the 
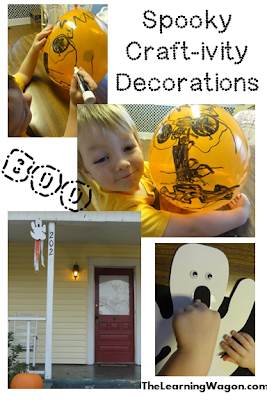
Jack-o-Lantern Balloon activity is that you only need 2 materials. A balloon and a marker. We used a dry erase marker because it was big and fat... good for my 3 year old to grip versus the skinner permanent markers I had on hand.
 
http://rvclassroom.blogspot.com/2014/10/spooky-craft-ivity-decorations.html 
You can choose any size orange balloon to do this. I said orange because... well that's the color of a traditional pumpkin, but your kids my want to be more creative and make green Frankensteins or witches, white ghosts or mummies, or purple monsters! Let the creativity go WILD! 

Wit my little one, I had him tell me what shape he wanted the eyes, nose, and then for the mouth he told me he wanted a frown with flat teeth. (Good way to develop descriptive vocabulary as well as practice his shapes!) When I did this activity with my kindergarteners, I would first create a Jack-o-Lantern balloon with my students. I cut out various shapes of eyes, noses, and mouths and put them in a lunch sack. I called on different students to pick one out of the bag. They would trace the shape they picked to help us create a class Jack-o-Lantern. Then, I would let each student decorate their own. If they got stuck and didn't know how they wanted to create the mouth or other parts, they could refer back to the shapes in the lunch sack. These were fun to hang all around the classroom! 

http://rvclassroom.blogspot.com/2014/10/spooky-craft-ivity-decorations.html 

Coloring in the shapes helps develop his hand-eye coordination skills, but he actually added a step on me... He always does! He decided to add a few more details on his own like glasses, tears, spit coming out of his mouth, and he turned his nose into a car. Can you see the wheels coming out of the right side of the rectangle?


The Ghost Windsock activity is another easy and fun activity! All you need is a white foam sheet, a black foam sheet, some crepe paper (white and orange), pen, wiggly eyes, glue, ribbon, and a stapler or tape. We also used some sparkle filler to jazz it up a little!
http://rvclassroom.blogspot.com/2014/10/spooky-craft-ivity-decorations.html 

I had a ghost pattern that I created when I did this activity with my kindergarteners. I just drew the design I wanted on a file folder and then cut it out to use as the pattern for them to trace. Sticker wiggly eyes are the best, but a dot of glue works too. If you put the staple through the mouth area of the ghost, you can cover it up with the mouth when you glue it down.

http://rvclassroom.blogspot.com/2014/10/spooky-craft-ivity-decorations.html 
I usually use a stapler to attach everything together (crepe strips, the back of the foam, the ribbon), but if you don't want your children to use the stapler, you can have them tape the crepe strips down and tape the foam together in the back and use tape to secure the ribbon. In the classroom, I had my students create a pattern with their crepe paper. Some would lay out orange, white, orange, white across the black foam. Others would do orange, orange, white, orange, orange, white, etc. 
http://rvclassroom.blogspot.com/2014/10/spooky-craft-ivity-decorations.html 

Like I said before, these activities are perfect for the classroom, home, or perfect on the awning of your RV if you're schooling on the road. We happen to be home for a couple of weeks, so ours is hanging on the porch, ready to spook some Trick-or-Treaters!

Have a wonderful and safe Halloween everyone... where ever you are!

God Bless Your Learning Journey ~


I've linked up at:


Crafts on Sea

Related Posts Plugin for WordPress, Blogger...