Showing posts with label craft. Show all posts

Tuesday, February 14, 2017

Candy Heart Subtraction Craftivity


HAPPY VALENTINE’S DAY!

I know this is a bit late, but I’m playing catch up around here. You may choose to do this activity now or save it until next year, but I know you and your students will love it.

Both my children and I love doing crafts, but I’m not a fluff person. I usually tie my crafts into some academic learning that we’re focusing on in school. This is a fun craft to practice subtraction and story problem skills.

Craft Time:

Materials:
Construction paper
        * 1 (9” X 12”) Sheet of red construction paper
        * ½ sheet of pink construction paper cut length wise
        * Cut 2.5” hearts out of red (1/student). Cut 2” hearts out of pink (1/student).
        * Cut 1” hearts out of pink, purple, blue, orange, green, and yellow
Scissors
Glue
Pen
Subtraction paper CLICK HERE FOR DOWNLOAD
        *Print and cut out prior to lesson

1. Provide your students with a sheet of red construction paper and have them write their name on the back.

2. Provide each student with a half sheet of pink construction paper and have them fold it in half length wise.

3. Have students glue the outside of one side of the folded pink paper and place it toward the upper center of the red paper with the fold at the top. The pink paper should open by lifting it up.


4. On the outside of the pink fold, have students glue the Sweethearts label found on the Subtraction paper download. I created this for you. As you can see from the example above I just wrote the word Sweethearts on construction paper. Then, glue the red 2” heart below that and a pink 1” heart inside the red heart.

5. At the lower center of the paper, have students glue the subtraction story paper found on the provided download.

6. Provide students with a variety of 1” hearts in the colors listed in the materials section.


Now, that the set is ready, the learning begins…

Begin by telling the students subtraction stories. For example, you might say…

There were 5 candy hearts in the box. 
(Students should move 5 hearts to the inside of the box.)
You ate 2 candy hearts.
(Students should move 2 hearts out of the box.)
How many candy hearts are left?
(Students count the hearts left in their box and provide the answer.)


Progress into helping your students tell the story with you. An example, might go like this…

How many candy hearts did you start with in your box?
(Accept a number from your students and have them move that many hearts into their box.
How many candy hearts did you eat?
(Accept a number from your students and have them demonstrate removing that number from the box.)
How many candy hearts are left?
(Students count the hearts left in their box and provide the answer.)


Last, allow students to make up their own stories and demonstrate them to you. Allow the students to glue their hearts to match their story.


Then, have them fill in the blanks of the subtraction story and write the subtraction problem to match.
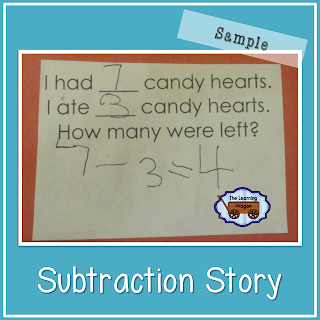


We had a great time with this activity. It was definitely a fun way to practice subtraction. Even my 3-year-old was excited about telling the stories.


God Bless You on Your Learning Journey ~


Thursday, August 25, 2016

The Right Hat for Success with Classroom Volunteers


It’s the beginning of the school year. Many of my teacher friends have returned to school. Many of my parent friends have sent their children off to school. As a former teacher, I wanted to share this thought with you…

Teachers wear multiple hats and even capes. We are communicators, facilitators, disciplinarians, evaluators, counselors, super heroes, and even mother-figures, but there’s another hat that needs a spot in the collection.

We all want our students to reach their highest potential and we see how differentiated instruction is beneficial to reaching this goal, but it’s difficult to say the least when teachers are stretched thin. At some point, it’s best if we take off the cape and say, “I just can’t do this on my own.”

There is a whole group of people out there that can help. Most teachers ask for parent volunteers at the beginning of the year and we get a few responses. We use the parent resources we can, but there’s an untapped pool of parents and grandparents out there that aren’t getting involved. Parents often don’t realize how useful they can be in the classroom, can’t speak English, or work full-time. So, we need to put on our Recruiter Hat and show them how they can get involved.

How to be a successful recruiter:

1.    Begin asking early and ask consistently. That doesn’t mean badger parents, but ask parents at Open House to mark the types of volunteering they can offer on a form. Then, call on different volunteers to help at different times throughout the year. 

    Check out this Bulletin Board craft that will help you get your year started off in the right direction by letting your students' parents know that you encourage their help and support at home and at school!


2.    Ask for help in a variety of ways. Yes, it would be great to have help in the classroom, but parents can be beneficial at home or occasionally traveling to stores to buy materials we need like paper plates for a story sequencing project.

3.   Be specific in your requests for the types of help you need. A parent might not feel comfortable teaching a small group, but they might be able to supervise students working on computers, read a book to the class, or listen to students as they read sight word flashcards.

4.   Ask them directly. Get to know your parents when they come in for Open House or Curriculum Night. Think of ways they can help that would work for them specifically. Then, make a phone call to personally invite them to help out the class.

5.    Offer a volunteer mini-course. There are parents that would love to teach small reading groups or work with students as they write stories, but they don’t have the confidence to volunteer or the knowledge to do it right. Teach them the basics they would need to successfully support students in these areas.

If you’re a classroom teacher, I encourage you to take the time to recruit parent volunteers. In the long run, it will save you time, not to mention all the benefits of having more help in and out of the classroom.

If you’re a parent, I encourage you to find a way that you can support that classroom teacher. The more help she has from parents, aunts, uncles, and grandparents, the better she can teacher all the students in her class, including yours.

God Bless You on Your Learning Journey ~


Teacher’s I have these excellent products that I developed and used in my classroom for 9 years that helped me get my parents involved in practicing reading skills with their children! I hope you take a moment to check it out!


Tuesday, October 20, 2015

Sparkling Spider Web


Halloween’s just not Halloween without spider webs. We had fun making these sparkling ones!


Materials:
White foam sheet
Silver Christmas tinsel
White glue
Spider foam shape stickers
Hole punch
Pipe cleaner


Directions:
1. Cut the foam sheet into a square.

2. Use white glue to make a tinsel-X in the middle of the square.

3. Then, place 2 more tinsel strips in an intersecting way through the middle of the X to make a cross.

4. Then, place a tinsel strip on the outside sides of the square.
* This was the limit to my children’s attention span, so that’s where we stopped.

5. (Optional) Cut shorter sections of tinsel and glue them in an octagon pattern around the web.

6. Allow your child to select one or more spiders to stick to the web.

7. Hole punch one of the corners of the white foam square.

8. Stick the pipe cleaner through the hole and twist it to create a circle.


You can hang the completed product on a door handle or cabinet door. You may even choose to hang it on a hook to decorate your front door! Enjoy!

Have a great time crafting this fall!

God Bless Your Learning Journey ~


Linky Parties I've connected with...
Chaotic Bliss HomeschoolingThe Felicity Jarhttps://www.busyboysbrigade.com/learning-from-each-other-blog-party-7/


Mom's Morning Coffee

Tuesday, October 13, 2015

Five Little Pumpkins (Number Recogntion)


http://rvclassroom.blogspot.com/2015/10/five-little-pumpkins-number-recogntion.html


We’ve been doing a lot of Halloween activities around here as I’m sure you are too. I want to share them with you so you can enjoy them just like we did. The activity I’m sharing today was actually inspired by a post I saw on Facebook. Kathy Griffin from Kathy Griffin’s Teaching Strategies shared Five Little Pumpkins Fall Activities. She describes several fun and academic activities to do with this spooky rhyme and she even created a new rhyme that’s a lot of fun too!

The Craft
This was fun and easy for both my two year old and my four year old. I cut out a piece of cardboard that I measured ahead of time to be long enough to fit ten craft sticks with spaces. The kids used white glue to draw lines on the cardboard and glue down the sticks. While we let that dry, I had them make the jack-o-lanterns. I gave them five clothes pins and five orange foam circles and one pre-cut jack-o-lantern fact which they used as a stencil to make the faces with a marker on their circles. They glued one jack-o-lantern to each clothes pin leaving a little of the clothes pin showing at the top as the stem of the pumpkin. Then, we add a small piece of green foam as the leaf for each pumpkin. All of this took a while to dry before we could actually move on to the activity because we are still working on our “little dab will do you” concept.

The Activity
As you can see, our variation works on number recognition. After reading the book and saying the rhyme a few times while placing our clothes pin pumpkins on the gate, I added the numbers to the gate sticks and the dots to the bottom portion of the clothes pins. Then, we said the rhyme again only this time slowly to be able to match each number and dot correctly as we went along. They loved it and still enjoy playing with it. Caleb has the rhyme down and says it everywhere we go. I often hear him reciting it while playing with the pumpkins on his own.

I look forward to sharing more Halloween Activities with you that we having been enjoying so visit again soon!

God Bless Your Learning Journey ~


I'm proud to share that this post is a Featured post at Busy Boys Brigade. Click the link below.

https://www.busyboysbrigade.com/learning-from-each-other-blog-party-7/

Monday, October 27, 2014

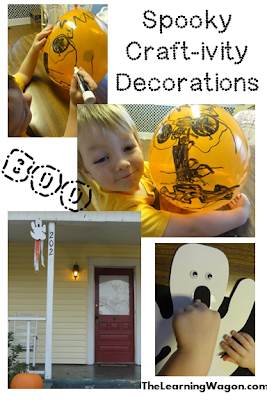
Spooky Craft-ivity Decorations

http://rvclassroom.blogspot.com/2014/10/spooky-craft-ivity-decorations.html 
Halloween is just around the corner and I am always waiting until the last minute to decorate, but I wanted to share with you some cute, EASY crafty decorations you children or students would love to make to help you decorate you classroom, home, or even RV! 

The best part about the Jack-o-Lantern Balloon activity is that you only need 2 materials. A balloon and a marker. We used a dry erase marker because it was big and fat... good for my 3 year old to grip versus the skinner permanent markers I had on hand.
 
http://rvclassroom.blogspot.com/2014/10/spooky-craft-ivity-decorations.html 
You can choose any size orange balloon to do this. I said orange because... well that's the color of a traditional pumpkin, but your kids my want to be more creative and make green Frankensteins or witches, white ghosts or mummies, or purple monsters! Let the creativity go WILD! 

Wit my little one, I had him tell me what shape he wanted the eyes, nose, and then for the mouth he told me he wanted a frown with flat teeth. (Good way to develop descriptive vocabulary as well as practice his shapes!) When I did this activity with my kindergarteners, I would first create a Jack-o-Lantern balloon with my students. I cut out various shapes of eyes, noses, and mouths and put them in a lunch sack. I called on different students to pick one out of the bag. They would trace the shape they picked to help us create a class Jack-o-Lantern. Then, I would let each student decorate their own. If they got stuck and didn't know how they wanted to create the mouth or other parts, they could refer back to the shapes in the lunch sack. These were fun to hang all around the classroom! 

http://rvclassroom.blogspot.com/2014/10/spooky-craft-ivity-decorations.html 

Coloring in the shapes helps develop his hand-eye coordination skills, but he actually added a step on me... He always does! He decided to add a few more details on his own like glasses, tears, spit coming out of his mouth, and he turned his nose into a car. Can you see the wheels coming out of the right side of the rectangle?


The Ghost Windsock activity is another easy and fun activity! All you need is a white foam sheet, a black foam sheet, some crepe paper (white and orange), pen, wiggly eyes, glue, ribbon, and a stapler or tape. We also used some sparkle filler to jazz it up a little!
http://rvclassroom.blogspot.com/2014/10/spooky-craft-ivity-decorations.html 

I had a ghost pattern that I created when I did this activity with my kindergarteners. I just drew the design I wanted on a file folder and then cut it out to use as the pattern for them to trace. Sticker wiggly eyes are the best, but a dot of glue works too. If you put the staple through the mouth area of the ghost, you can cover it up with the mouth when you glue it down.

http://rvclassroom.blogspot.com/2014/10/spooky-craft-ivity-decorations.html 
I usually use a stapler to attach everything together (crepe strips, the back of the foam, the ribbon), but if you don't want your children to use the stapler, you can have them tape the crepe strips down and tape the foam together in the back and use tape to secure the ribbon. In the classroom, I had my students create a pattern with their crepe paper. Some would lay out orange, white, orange, white across the black foam. Others would do orange, orange, white, orange, orange, white, etc. 
http://rvclassroom.blogspot.com/2014/10/spooky-craft-ivity-decorations.html 

Like I said before, these activities are perfect for the classroom, home, or perfect on the awning of your RV if you're schooling on the road. We happen to be home for a couple of weeks, so ours is hanging on the porch, ready to spook some Trick-or-Treaters!

Have a wonderful and safe Halloween everyone... where ever you are!

God Bless Your Learning Journey ~


I've linked up at:


Crafts on Sea

Monday, September 1, 2014

Patriotic Hat


http://rvclassroom.blogspot.com/2014/09/patriotic-hat.html


To celebrate Labor Day, we had fun creating hats together. We were going to wear them as we watched the golf cart parade at our campsite, but naptime conflicted, so we just went on a walk around the campground in our own parade fashion!
To make the hats…

Materials:
Blue, red, and white construction paper
Glue or paste
Star and heart shaped foam stickers
Marker
Scissors
Tape or Stapler


Directions:


1. Fold the blue construction paper in half so that the long sides touch. Then fold it in half again so that the folded long side touches the opposite long side. When you open it up, you should have 3 folds. Cut on the folds to create 4 strips of blue. The will create the head band. Most likely, you will need to use 2 strips to make it around your child’s head. You’ll need to staple or tape the strips  together at one end.

2. Place the blue headband around your child’s head to measure how big it needs to be. Where the 2 ends overlap, fold that section to the back so the child doesn’t decorate it with foam shapes.


3. I have the children pick one foam shape to place over the staple area or tape used to connect the strips. This is the middle of the headband.

4. Using a marker, either write or have your child write their name on the left side and the year on the right side of the middle foam shape.

5. Have your child decorate with foam shapes on the front.

6.. Tear strips of red and white construction paper down the long end of the paper.

7. To encourage patterning practice, have your child glue the strips of paper in a pattern (AB, AAB, ABB, or AABB). Make sure they place a line of glue on the headband and then match the bottom of the torn strip to the bottom of the headband so that the strips don’t stick out in the child’s face.


8. Let dry.

9. Measure again to make sure the hat will fit properly and then use the tape or stapler to connect the hat in the back.

10. (Optional) You can encourage your child to curl or bend the strips to for added wackiness around their head!

I used to make these with my kindergarten students to wear in a school parade we always did on Constitution day. I believe the inspiration for this craft came from a similar version hat that I saw in a Mailbox Magazine many, many years ago. For all these years, it has been a fun, super cute, and great activity for any patriotic occasion!

God Bless your Learning Journey~


Related Posts Plugin for WordPress, Blogger...