Friday, November 25, 2016

Painting with Shaving Cream


Shaving cream is one of those things teachers either love or hate. I tried it once in my kindergarten classroom in a whole group lesson and learned my lesson not to do that ever again! However, I didn’t give up on it… I tried it again in small groups and it was much more manageable, but it’s not like it came out once a week… or once a month even.

Now that I’m homeschooling the shaving cream has come out of the cabinet a few times this year. We’ve practice writing letters, our names, sight words, and numbers. I’ve figured out a few tricks through the years that have made things a little easier, which I’ll share with you later.

This week is Thanksgiving week, so we’re taking a break from the routine and just having fun so I gave the kids a choice…

Shaving Cream or Watercolor Paint

It was a tough choice. They love both, but obviously, they chose Shaving Cream! Since they love painting also and they didn’t choose that I thought maybe they could combine both worlds by painting with shaving cream. They liked the idea, so I pulled out the paint brushes and this is how we got started!


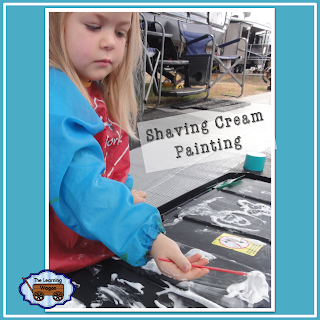
Painting with Shaving Cream:

Materials:
Shaving Cream
Paint brushes (any size will work, but small watercolor paint brushes work great)
Squeegee or cut plastic square (I’ll share more about this later.)
Smock
Optional Decorations: beads, cut pipe cleaner, cut straws, bells… the list goes on!

Tip #1.  Choose a good spot. Shaving cream can get messy pretty fast, but it can be cleaned up pretty easy if you do it right. I like to be near a sink or water source. You don’t want 10 five-year-olds walking down the hall with shaving cream covering their hands, because that’s not the only place the shaving cream will be in the next 5 minutes.

Tip # 2. Choose a smooth surface. You want clean up to be fast and easy to make transitioning into the next activity fast. We have a plastic picnic table that has a gritty surface. While it might be a fun sensory experience at some point, in general the rough surface would make clean up difficult unless you could just spray it off with a hose.

Tip #3. Wear a smock to cover clothing. Even a large old t-shirt would help.

Tip #4. Keep some wipes or paper towels nearby to do a quick wipe up of any shaving cream that drips on clothing, the floor, or anywhere else it is not supposed to be.

Tip #5. Go through your behavior expectations before you spray the shaving cream on the table. It’s important to mention rules like, “Do not clap while you have shaving cream in your hands.” I even explain the WHY. “It might go in your eyes or your friends and it hurts. Even still they might try it, so be prepared with wipes or a sink for eye washing. Also, it’s important to let them know where the shaving cream is allowed to be and where it is not. For multiple students painting in a general area, let them know where each student’s personal painting area is. If they have a difficult time understanding this concept, use painter’s tape to mark a square in front of them.

Tip #6. Squeegees work well to easily clean up shaving cream from a table, but there have their cons. One drawback is their size and shape. Even the smallest size is pretty big so whether you keeping just one or one for each student, storing them could be a setback. Instead, I recommend using a cut plastic square. How? you may ask… It’s simple.


Take a plastic folder and cut it into about 3 inch squares. These are great because storage for even 30 would take up minimal space. They are cheap. One folder would make enough for several students. Also, these work great as erasers. Their small size makes them easy to have on hand for each student. Just show the kids how to use the edge to scrape the table clean and the bend the plastic square while smearing the cream back on the table in a pile. In addition, you can also have them use the squares to spread the shaving cream evenly in front of them.


Directions:

1. Spray a pile of shaving cream in a central location. I typically choose the middle of the table if students are sharing. As I learned during my first experience, less is more with shaving cream. You can always add more.

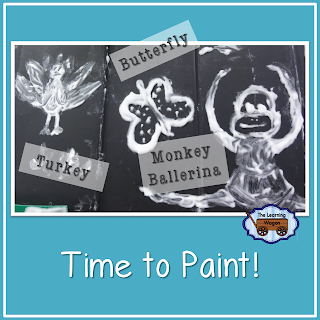
2. Provide the students with a paint brush that they can dip in the shaving cream and then paint a chosen object or scene in front of them. They can also paint words or numbers if you want to add academics back into this activity.

3. When finished, have them use their “eraser” a.k.a. cut plastic square, to wipe their area clean and begin again.

Even I joined in the fun...


Christmas Activity:

We had fun shaping the shaving cream into a triangular Christmas tree shape. Then, decorated the tree with cut pipe cleaner as garland and a yellow star topper as well as beads for ornaments. It would be fun to see what designs kids could create. There are many shapes that would be fun to decorate in this fashion from wreaths to snowmen.


Last Thought… If you have some food die to change the color of the shaving cream, I think it would even make this activity more interesting. We might try that next time!

Do you love this idea? Try it! I’d love to hear all about your learning experience and share your pictures too!


God Bless You on Your Learning Journey ~


Thursday, November 17, 2016

Learning to Sew A Button: Creating a Buttoning & Unbuttoning Activity


Club Time

In an effort to spend more time individually with our children, my husband and I have set aside a time each week for Boys’ Club & Girls’ Club. This gives us a specific opportunity to teach our children to become Godly men and Godly women. We plan specific learning experiences where we can teach our children life skills and role model Godly character in specific situations.

Today in Boys’ Club, Caleb learned gun safety skills at the gun range with Daddy. They shot at our left-over pumpkins to see the damage a bullet can cause.

During our Girls’ club time, I introduced the skill of sewing a button to Lily. Then, we practiced the fine motor skill of buttoning and unbuttoning.  We had a lot of fun together. Would you like to hear about what we did? If so… Keep Reading!


Sewing a Button Activity:

Materials:
Buttons
Needle
Tread
Scrap Fabric Square or Embroidery Interfacing Square

*Disclaimer:  I didn’t have a plastic needle that would fit through the holes of the buttons I had bought for this activity, so we used a real needle. My little girl is 3 years old. I took into account her fine motor abilities, listening skills, and focusing skills when deciding if she was ready to be trusted with a real needle under focused and cautious supervision.

1. The first thing we did was introduce vocabulary of the needle. I stressed that this was a real needle with a real sharp tip that would hurt if it poked into skin… hers or mine.

2. I introduced the word thread and showed her how to thread the needle through the eye.

3. I introduced the word knot. I demonstrated making a knot and explained why it was needed.

4. I demonstrated how to sew the button on the interfacing square a few times and then held the button while Lily stuck the needle through the hole of the button and pulled it through the opposite side. (You may choose to use a scrap piece of fabric for this part of the activity.)

5. When the thread became short, I tied it off in a knot, and cut the string.

6. After the first button was completed, I got her started on the following buttons, but I allowed her to hold the buttons on her own.


7. She sewed the last 2 buttons on a separate interface square on her own with just a little help from me to make sure she continued to go in the right direction. When she finished, I cut 2 holes to match the buttons in the opposite side that were just big enough for the large buttons to fit through.


8. After cleaning up our mess, I showed Lily what we made. A new “toy”! One where she could practice buttoning and unbuttoning on her own. She was so excited that she had made something herself and enjoyed using it over and over again. When Daddy got home she eagerly told him and showed him what she had made and what she could do with the buttons.


For the first button, I allowed Lily to select a button of her choosing. She chose a pink one that just happened to be a large button and it worked well because there was space for my fingers to help her hold the button as she pressed the needle in and pulled it out.

The second button she chose was a purple button that just happened to be a small button. This button made our activity difficult as there wasn’t a safe place to hold the button and caused an accidental poke. No worries! She didn’t even draw blood… tis the life of one that sews.  

After this, I encouraged her to choose a large button instead. We made it through with no further pokes! Yay!

Have you started teaching your child to sew? What are some of your favorite lessons? We had such a great time with this activity that I am definitely planning more sewing during our Girls’ Club time!

Do you like this idea? Try it! I’d love to hear all about your learning experience!


God Bless You on Your Learning Journey ~


Friday, November 11, 2016

Digging into Reading


Digging into Reading

Our kids LOVE their sandbox. We built it for them a few months ago and it is their favorite place to be. A few weeks ago, we played paleontologist. We hid some plastic dinosaurs and sea shells under the sand and then used a paint brush to carefully dig them up. We all had a blast with this game!

This week for reading Caleb was learning some new sight words and Lily was practicing some new short a-blends. We’ve played matching games and sorted words/blends, and used stickers to build the words/blend, but this week I took a little different approach.

I quickly selected 10 sight words I wanted Caleb to practice and I pulled out 10 a-blend cards for Lily. I quickly stuffed them into the sand about an inch down or less as they were playing without saying a word. This caught their attention and right away they were excited to play… and READ!

Playing Word Paleontologists:


Hand your children a paint brush and their off! We get into our paleontologist role by pretending that each flashcard found is rare and fragile. They must carefully use the paint brush to wipe away the sand until it is all swiped clear. (It helped that we did this when playing paleontologist with the dinosaurs and seashells as well!) We are all excited about a dig find and eagerly work to figure out what message is on the card.


As I mentioned, we practiced reading sight words and short a-blends, but this activity is great for practicing all kinds of skills such as letter names/sounds, blends, sight words, and vocabulary words. You could bury a card that had a picture or a word on it and have your child tell you a rhyming word. You could bury index cards with complete sentences on them to have them practice fluency skills. I also think it would be fun to bury a sentence in the sandbox each word on a different card and have your child try to figure out the secret message once all the words are uncovered!


We became Word Paleontologists, but your children might become Number Paleontologists! This would be a fun way to practice recognizing numbers, counting how many dots, addition, or subtraction problems and so much more! They could uncover a number and you could ask them to tell you a number that was more, less, or equal to that number. The list goes on and on!

Don’t have a sandbox? This activity could easily be done by anyone just by placing flashcards face down in a large plastic bin and covering them with some play sand.

On a side note, our sandbox is outside and although it is covered the sand just a few inches below the surface is damp from rain water that comes up from the ground. Caleb’s sight word cards were laminated and were unharmed in the process of this activity. Lily’s blends were written on index card stock and were not laminated. After finding them, although they were not damaged, you could tell they were near some moisture.

Do you like this idea? Try it! I’d love to hear all about your learning experience!


God Bless You on Your Learning Journey ~


Sunday, October 23, 2016

Roadschooling in Savannah, Georgia


Roadschooling in Savannah, Georgia

Savannah is one of my favorite places to visit, mostly because my sister and her family live there, but it’s also a beautiful city with lots of history.

Before our visit, I found this See 3 Pass where you can choose to visit 3 of the 5 museums on the list for a discounted price, which ends up being equivalent to a buy 2 get one free. Take note where it says, “Valid for 3 days from the date of purchase.” That’s important to know as some museums are closed on some days and the train may only ride on certain days at different times of the year.

If you’ve been hanging around here, you know I have 2 small children. I chose the 3 museums that I thought would work best for us, but you might think the others would be more interesting to your family.

Our Savannah Museum Experiences:

Day1. Old Fort Jackson 


To be honest, due to the ages of my children, this was my third choice from the list of museums, but after our visits, this turned out to be my favorite. The fort itself is pretty small, there are several canons, and a variety of rooms with some educational artifacts. What made it so special was the employee dressed in time period garb who brought this fort to life and made every part of it fun and educational for adults and children alike! 


After doing our own walking tour of the facilities, the employee (I wish I knew his name to give him credit) invited all the visitors to come together to learn more about weapons fired during the Civil War. He asked for volunteers, which ended up being Caleb and Lily. He taught them how to stand in line and march to commands like the soldiers did. They were each given a wooden shotgun and taught how the soldiers would carry it. Then, in front of the audience, he demonstrated how soldiers of this time period would load their gun while guiding my kids to load their guns in a similar way. Then, he demonstrated firing the gun while my children “pretended” to fire their own guns in like fashion a safe distance away. Even after the presentation, my children were allowed to pretend with these guns. They’re favorite thing to do was to stick them through the windows to “shoot” at the enemy just like soldiers of the past. When their interest started to wan, he invited Caleb and Lily to learn about Morse code first hand using a telegraph. He showed them how one machine was used to send messages while the other received them and what to do to the machines to switch their uses. Then, he allowed them to send and receive messages to each other. He also gave them a one on one demonstration on how soldiers sent messages to others in Savannah using flags and let them practice waving flags to make the letters in their name. The last demonstration was the firing of the canon, but again this employee did not just stand and talk to the crowd who patiently awaited a loud, KA-BOOM! Instead, he asked for volunteers. My two children, another older girl, and myself were enlisted. He gave us each a job that a real solider had and instructed us on how to do each task the way the real soldier would have to fire this canon, up to the point of firing it, but not. When he finished, we all moved a safe distance away and watched him complete all the steps himself to demonstrate firing the canon.

KA-BOOM!


The entire visit was interesting, fun, and educational. I credit this particular employee who had a great demeanor with both adults and children with making our experience so wonderful. I highly recommend this museum.

On a side note… BEWARE of the Crabs! There are about a gazillion crabs especially around the moat, but that’s not the only place they are. These critters climb walls, which with their pointy little feet is quite amazing. I know in my head these guys are much more scared of me then I should be of them, but when you go to the bathroom and reach for the toilet paper hanging on the wall, you don’t expect to see a crab hanging on the wall just above it! I swear I swallowed my heart!


Day 2. Savannah Children’s Museum 


We love children’s museums. We’ve been to many all over the country and some are better than others. This is the first children’s museum that was completely outside. In Savannah, even at the end of September, it was hot. There were some shaded areas and there’s a train car that is air conditioned where kids could read books, play with trains, and draw. Even though it was outside, it had many of the same activities that most other children’s museums have like large building blocks, a water table, musical instruments, and dress up. There was a playground, but half of it was roped off for some reason. They also had a misting station and a giant maze. It looked like they were remodeling a building next door to provide additional experiences about the U.S.S Colonial and Marsh Lands. Would we go back? Yes. It was a fun experience for the kids.


Day 3. Georgia State Railroad Museum 


This was actually located in the exact same location as the Children’s Museum. At this museum, you can take a walking guided tour or go on your own around the train yard. In addition, you can take a short train ride tour around the yard and learn about how this train yard had been used and changed over the years. On different days, they will pull out different trains to pull the passenger cars (diesel and steam).

We got to ride the steam train, which was neat, but make sure they wipe down the passenger seats before you sit down. Initially, we thought Caleb and Lily had been rolling around in the train yard somewhere as their legs were covered in a black chalky powder. Later, we found out it came from the seats in the passenger car. Everyone had black soot on their shorts rears when we went and it obviously wasn’t the first time as the conductor was telling us secret ingredients of how to wash our clothes to get the stains out!
 
I thought this museum pass was a great deal and I’d definitely do it again. We had a lot of fun learning in historical and modern ways. I look forward to visiting Savannah again as I miss my family and I’m excited about the many more learning opportunities this city offers.

Have you been to Savannah lately? What have you and your family done that you enjoyed and found educational? I’d love to add some more ideas to our list of learning stops! Thanks for sharing in advance!


God Bless You on Your Learning Journey ~


Thursday, August 25, 2016

The Right Hat for Success with Classroom Volunteers


It’s the beginning of the school year. Many of my teacher friends have returned to school. Many of my parent friends have sent their children off to school. As a former teacher, I wanted to share this thought with you…

Teachers wear multiple hats and even capes. We are communicators, facilitators, disciplinarians, evaluators, counselors, super heroes, and even mother-figures, but there’s another hat that needs a spot in the collection.

We all want our students to reach their highest potential and we see how differentiated instruction is beneficial to reaching this goal, but it’s difficult to say the least when teachers are stretched thin. At some point, it’s best if we take off the cape and say, “I just can’t do this on my own.”

There is a whole group of people out there that can help. Most teachers ask for parent volunteers at the beginning of the year and we get a few responses. We use the parent resources we can, but there’s an untapped pool of parents and grandparents out there that aren’t getting involved. Parents often don’t realize how useful they can be in the classroom, can’t speak English, or work full-time. So, we need to put on our Recruiter Hat and show them how they can get involved.

How to be a successful recruiter:

1.    Begin asking early and ask consistently. That doesn’t mean badger parents, but ask parents at Open House to mark the types of volunteering they can offer on a form. Then, call on different volunteers to help at different times throughout the year. 

    Check out this Bulletin Board craft that will help you get your year started off in the right direction by letting your students' parents know that you encourage their help and support at home and at school!


2.    Ask for help in a variety of ways. Yes, it would be great to have help in the classroom, but parents can be beneficial at home or occasionally traveling to stores to buy materials we need like paper plates for a story sequencing project.

3.   Be specific in your requests for the types of help you need. A parent might not feel comfortable teaching a small group, but they might be able to supervise students working on computers, read a book to the class, or listen to students as they read sight word flashcards.

4.   Ask them directly. Get to know your parents when they come in for Open House or Curriculum Night. Think of ways they can help that would work for them specifically. Then, make a phone call to personally invite them to help out the class.

5.    Offer a volunteer mini-course. There are parents that would love to teach small reading groups or work with students as they write stories, but they don’t have the confidence to volunteer or the knowledge to do it right. Teach them the basics they would need to successfully support students in these areas.

If you’re a classroom teacher, I encourage you to take the time to recruit parent volunteers. In the long run, it will save you time, not to mention all the benefits of having more help in and out of the classroom.

If you’re a parent, I encourage you to find a way that you can support that classroom teacher. The more help she has from parents, aunts, uncles, and grandparents, the better she can teacher all the students in her class, including yours.

God Bless You on Your Learning Journey ~


Teacher’s I have these excellent products that I developed and used in my classroom for 9 years that helped me get my parents involved in practicing reading skills with their children! I hope you take a moment to check it out!


Friday, August 5, 2016

Chalk Rocks: An All-Natural Art Craft


Kid’s Art: Rock Chalk Designs


Are you planning to do a rock study this year? We’ll if you are save this activity for when you finish. It’s a lot of fun and it will give your students a relaxed environment to talk about the observations they make about rocks together.


The Preparation Stage…

Go on a Rock Hunt


Grab a bucket and head out to the woods or a rocky creek bed or anywhere you might find some pretty big rocks. You don’t want your child picking up anything that is going to injure their back lifting it or their foot dropping it, but something about the size of a man’s fist is good. Grab a few if there are plenty available. We had a good time looking for just the right size rocks. We compared the sizes of all the rocks we saw. We talked about their weight as we picked them up… or tried to. We talked about how some were stuck in the ground and why/how that happens sometimes.

Cleaning Rocks


We had a lot of fun with this part of the activity as in we made a really big mud mess! I gave my kids a tub of water and some paintbrushes to wash the rocks off. They had a good time flinging mud sprinkles as they scrubbed away at their rocks. It was fun for me to listen to their conversations about the rocks during this time. One would say, “Look! I found a shiny spot.” While the other child would point out that he found one with black speckles. Once we got all the mud and dirt off of the rocks and onto our clothes, we set the rocks out to dry. If you’re not into letting your kids get dirty, wearing old clothes or a smock would be a good idea.

The Designing Stage…

Rock Chalk Designs


Once the rocks were dry, with chalk in one hand and a rock in the other, my kids started decorating. Lily Anne loves pink, so here rocks were pick by design. Caleb tried to draw trucks and tractors on his rocks, but in the end decided to color them in.

Using chalk paint would also be a fun way to decorate rocks.

The best part about this activity is that we can enjoy the beauty of our art word, but that the rocks can be returned to nature undisturbed. I especially enjoy find artistic ways my kids can express themselves without using a medium that takes up space in our limited space RV. Taking a picture helps us keep the fun memories and the beautiful designs in our hearts.


I hope your children enjoy getting creative with rocks too! I’d love to hear how they went! Feel free to let me know in the comments below or find me on Facebook or Twitter! I always love to hear from my readers!


God Bless You on Your Learning Journey ~


Wednesday, July 13, 2016

Curriculum Choice… The path that lead me to Christ Centered Curriculum


The path that lead me to Christ Centered Curriculum

This is the time I have been waiting for… my oldest child has turned 5 and will officially begin kindergarten in our homeschool. Don’t get me wrong. I’m a teacher. Teaching is in my blood. It’s my passion. My boy has been learning since the day he was born and I’m proud of his academic knowledge. He’s a pretty smart kid. But, for me, this is different. This is kindergarten.

Initially, I wasn’t really looking for a curriculum. I have GOBS (this is a literal amount meaning Grand, Opulent, Bountiful Supply) of teaching materials from my former days as a public school kindergarten teacher, but there was one area my materials were deficient. Biblical lessons.

We probably have about 5 Bible Story books, but I haven’t really been happy with them either. The information has been so watered down in them. It makes for an uninteresting and more importantly a difficult to relate to or learn from kind of story.

So I started my search… I looked at as many Christian based curriculums I could find. Based on my research and the samples I looked at I found some that seemed very worksheet based, some that told Bible stories in the same watered down style, and some surprisingly didn’t seem to focus much on God at all. At this point, I didn’t really know exactly what I wanted, but the curriculums I looked at didn’t feel like what I was hungry; I was blind.

I asked the few people that I know that homeschool what curriculums they were familiar with or would recommend, but they named some of the same ones I wasn’t impressed with. I was disheartened. While I can’t say that I specifically prayed for God to guide me, it was definitely a prayer that was in my heart. Looking back, I should have stopped relying on my own research and asked God to lead me, but thank goodness we have a gracious God that knew what I was looking for even when I didn’t have a clue.

Somehow, going from link to link one day, I landed upon this article written by Doreen Claggett, “God-Centered Education vs. Child-Centered Education.” This article challenged many of the educational beliefs that I had formed over the years as a classroom teacher and even more so those that I had formed through my research of the best homeschooling practices. But… I know God was working in my heart, because the statements she made, many which contradicted my own teaching philosophies, began to make sense. It’s like the scales fell away from my eyes and I was no longer blind.

What challenged my teaching philosophies:

1.    A God-centered education begins with memorization and develops into understanding, not just through experiences. Sorry unschoolers, this applies to you. Honestly, I’ve dabbled in unschooling my children, allowing them to just learn through the experiences we provide them with as we travel around the country, but the best experiences are the ones that we studied about beforehand. Providing children with a multitude of experiences is a wonderful thing for their background knowledge, but the experiences themselves do not provide a deep and lasting education. Taking the time to learn about a historical site, animal habitat, landform, or any other educational opportunity before your child experiences it, and better yet discovering the connection to God will enlighten their minds so much more.

2.   In a God-centered education, the teacher is the imparter of knowledge, not the facilitator. Again, this contradictor the facilitator push from the public school system. I think in an effort to try to move away from the boring lecture, as usual the pendulum swung to the other extreme. But, if you think about it, little ones absorb knowledge from the ones they talk to and when they discuss thoughts and concept. The teacher is the one with the knowledge. Around a table or while sitting on a couch together, that information can be passed from the teacher to the student. Memorization is the beginning of a journey toward understanding. We don’t have to wait until the child is “developmentally ready” to understand a concept before we introduce it to them. Before that time, they have the ability to memorize the information until the light bulb goes on. Claggett says,

“…we need to recognize that the appetite that is fed the most will grow the most. The more "fun, fun, fun" is incorporated into education---and children's daily lives---the more likely they will crave "the world and all that is in it" (1 John 2:15-17). Normally, when the fun-and-games stop, so does the learning. How then can we expect to instill a delight in God and lifelong learning if He seems dull in comparison to worldly pleasures? And how then will that ultimately affect His command to study to show ourselves approved unto Him (2 Tim. 2:15)?

3.   A God-centered education is structured to work first, then play; not play as work. This conclusion made me widen my eyes! I am all about playing games and having fun learning. They’re little kids. They want to play. They need to play. Right? Yes, but they can play after they work. Not everything we do in life is fun as children or adults. We need to instill from an early age a dedicated attitude. One that is committed to accomplishing something no matter how boring or difficult it is, because it is worth it. Once done, we can thank God for His help throughout the struggle, enjoy a feeling of accomplishment, and celebrate with a time of play. This is what we as mature adults do. We should encourage our children to learn the importance to getting a job finished, rather than satisfy their own desires of having fun. Yes, they may be young, but they can do it at their own level and they should be trained from an early age, because self-discipline, self-control, and self-denial are difficult concepts that take a long time to master.
 

Why I chose Christ Centered Curriculum:

After reading this article, I clicked on the various tabs at the top to read more and more. I learned about the Christ Centered Curriculum, but I wanted to know more. I found samples some from the Christ Centered Curriculum website and some from other online sources. I fell in love with the way scripture and principles of God where woven through each lesson. I wanted to learn even more so I purchased the book, “Never Too Early” by Doreen Claggett, which I highly recommend for you to read. The book shares a great deal of insight that I feel is important to know beforehand about the curriculum and how to use it properly.  To me, this doesn’t seem to be a curriculum that you just buy and get started with because over the years most of us have heard the statements of the world so often that we accept them as truths. I know I did. You know the statement, “Not everything on the internet is true.” Well… that’s true. Our source for information should come from the Bible. It’s not out of date and with a little help, we can find the answers to our questions on how God wants us to educate our children.


Is it everything I hoped for?

I don’t know yet. I’ve purchased the Complete Math + Phonics Package B, which includes Package A resources (created for older 3 year olds… Lily Anne) and Package B resources (created for older 4s and 5 year olds… Caleb). Some of it will be a review for him as he already knows most of his numbers to 100, recognizes all letter names, letter sounds, many sight words, and is beginning to read cvc words, but I wanted to go with this package because scripture is tied to each concept. This is what we will be focusing on this year.

When the school year is over, I plan to do a review on the Christ Centered Curriculum to let you know if it was everything I was looking for in a curriculum.

Do you use Christ Centered Curriculum? Have you in the past? Did it work for your family? If not, did you research how it was created to begin with and why? I’d love to hear from you.

An Enlightening Statement:
God centered education was designed from the begin by the Hebrews so that “Scripture was the starting point of instruction; it was never tacked on.”


God Bless You on Your Learning Journey ~ 


Side Note:  Do you love the First Day of School sign on the Cover photo? It is made by my friend Gillette Smith and she does great work! It's actually a front and back sign with the back being the Last Day of School! If you're interested in more information about buying one (great for traditional school as well as homeschoolers!) contact her:  Gillettepsmith@gmail.com

Sunday, June 5, 2016

Hotel Hacks: Tips for Making Hotel Stays Easier


Five Hotel Hacks

We just finished a month long hotel hop from Georgia up through Wisconsin around the lake to Michigan and back down to Georgia. You can read about our travels for the Chicken Whisperer tour where my husband teaches workshops and does book signings by reading Hoteling-it Around the Country.

While preparing for and during our travels, we came up with some hotel hacks that made our travels easier and more home-like. I’d like to share them with you!


Hotel Hacks


1.    Insulated cooler bag: These types of bags are perfect for storing your shower items. No travel-size bottles for us! Inside we place shampoo, conditioner, face wash, body wash, lotion, our scrubbies, and toothbrushes (more about this later). The insulated inside makes it an easy clean up if anything spills and you don’t have to worry about anything leaking through.


2.    Suction cup hooks: We’re a scrubby family. After a few days of traveling, I quickly realized, there is never a place to hang your scrubby where it won’t fall to the bathtub floor. Ick! I stopped by the Dollar Store and picked a couple up. There was only one hotel that had a textured shower wall where the hooks wouldn’t stick to the wall. All the other showers worked perfectly! We never had to worry about where to place the scrubby again!


3.   Fold-Up Stool: We didn’t actually take this on the Chicken Whisperer tour, but we had to stay in a hotel about a month afterward and that time I made sure to bring the fold-up stool from our camper. I have a 4 year old and a 3 year old. Hotels don’t make sinks for children of this size to reach. Maybe you have a better idea, but every time they went potty or needed to brush their teeth over the tour period, I had to lift them up to reach. I’m not 20 years old anymore and my kids are getting heavier and heavier. During the last hotel stay, my daughter was able to get on the potty and wash her hands all by herself just with the help of the stool! It made life so much easier!


4.   Cheap Plastic Toothbrush Holder: We always cover our toothbrushes with the Steripod toothbrush sanitizers, which worked out perfectly because we kept all our toothbrushes in a cheap plastic toothbrush holder and then we stuck the whole thing down into the shower bag. Once we arrive at the hotel, I pull it out and place it next to the sink. I never had to worry about our toothbrushes rolling over and touching the hotel counters… Yuck! The picture above is a toothbrush holder I found at Walmart specifically for traveling, but you can use any holder that fits toothbrushes for your family members.


5.    A Nightlight: I was surprised by how few bathrooms had a dim light. It was either on or off. In the middle of the night when I take my kids or go myself, I prefer not to blind us. Next time, we will pack a nightlight for sure! These are the nightlights we use from Walmart in our camper.

I hope you found this post helpful. Maybe you have some helpful tips as well. Feel free to share them in the comments below so we can benefit from each other!


God Bless You on Your Learning Journey ~


Related Posts Plugin for WordPress, Blogger...