Showing posts with label fine motor skills. Show all posts

Thursday, November 17, 2016

Learning to Sew A Button: Creating a Buttoning & Unbuttoning Activity


Club Time

In an effort to spend more time individually with our children, my husband and I have set aside a time each week for Boys’ Club & Girls’ Club. This gives us a specific opportunity to teach our children to become Godly men and Godly women. We plan specific learning experiences where we can teach our children life skills and role model Godly character in specific situations.

Today in Boys’ Club, Caleb learned gun safety skills at the gun range with Daddy. They shot at our left-over pumpkins to see the damage a bullet can cause.

During our Girls’ club time, I introduced the skill of sewing a button to Lily. Then, we practiced the fine motor skill of buttoning and unbuttoning.  We had a lot of fun together. Would you like to hear about what we did? If so… Keep Reading!


Sewing a Button Activity:

Materials:
Buttons
Needle
Tread
Scrap Fabric Square or Embroidery Interfacing Square

*Disclaimer:  I didn’t have a plastic needle that would fit through the holes of the buttons I had bought for this activity, so we used a real needle. My little girl is 3 years old. I took into account her fine motor abilities, listening skills, and focusing skills when deciding if she was ready to be trusted with a real needle under focused and cautious supervision.

1. The first thing we did was introduce vocabulary of the needle. I stressed that this was a real needle with a real sharp tip that would hurt if it poked into skin… hers or mine.

2. I introduced the word thread and showed her how to thread the needle through the eye.

3. I introduced the word knot. I demonstrated making a knot and explained why it was needed.

4. I demonstrated how to sew the button on the interfacing square a few times and then held the button while Lily stuck the needle through the hole of the button and pulled it through the opposite side. (You may choose to use a scrap piece of fabric for this part of the activity.)

5. When the thread became short, I tied it off in a knot, and cut the string.

6. After the first button was completed, I got her started on the following buttons, but I allowed her to hold the buttons on her own.


7. She sewed the last 2 buttons on a separate interface square on her own with just a little help from me to make sure she continued to go in the right direction. When she finished, I cut 2 holes to match the buttons in the opposite side that were just big enough for the large buttons to fit through.


8. After cleaning up our mess, I showed Lily what we made. A new “toy”! One where she could practice buttoning and unbuttoning on her own. She was so excited that she had made something herself and enjoyed using it over and over again. When Daddy got home she eagerly told him and showed him what she had made and what she could do with the buttons.


For the first button, I allowed Lily to select a button of her choosing. She chose a pink one that just happened to be a large button and it worked well because there was space for my fingers to help her hold the button as she pressed the needle in and pulled it out.

The second button she chose was a purple button that just happened to be a small button. This button made our activity difficult as there wasn’t a safe place to hold the button and caused an accidental poke. No worries! She didn’t even draw blood… tis the life of one that sews.  

After this, I encouraged her to choose a large button instead. We made it through with no further pokes! Yay!

Have you started teaching your child to sew? What are some of your favorite lessons? We had such a great time with this activity that I am definitely planning more sewing during our Girls’ Club time!

Do you like this idea? Try it! I’d love to hear all about your learning experience!


God Bless You on Your Learning Journey ~


Thursday, January 14, 2016

Wrapping Paper Fine Motor Activities


If you’re like me, as you’re wrapping Christmas presents, you keep little scraps of wrapping paper because you MIGHT use them later. Well, if you didn’t use those little scraps up, check out these fun ways to let your children play and learn with them all while building fine motor muscles.

http://rvclassroom.blogspot.com/2016/01/wrapping-paper-fine-motor-activities.html


Wrapping Paper Fine Motor Activities:

Ripping & Pasting

Ripping wrapping paper (even the cheap stuff) can be difficult if they don’t do it right. Initially, Lily, my 2 year old wanted to grab a fist full in each hand and pull the paper apart. Even my 4 year old, Caleb, wanted to rip the paper by pulling it in opposite directions. After a little instruction and some practice, they got the hang of it. I told them to pinch the paper front and back making their thumbs kiss in the front and their pointing finger kiss in the back. Then, I had them hold one hand still while the other twisted forward and down. Ripping is definitely an important skill to learn. Even as adults, we rip paper out of notebooks, checks out of the checkbook, and when you don’t have scissors around (and let’s face it… you can never find a pair when you need it) you rip coupons out, a phone number off a paper, the wrapping paper off a present, or a package of chicken nuggets out of your freezer.

Have you ever ripped the bar code off a coupon or ripped right through the phone number you just wrote down? Frustrating Huh? At this point, I’m just having my kids rip, but eventually, they’ll practice ripping in a straight line or later around objects. It’s a helpful skill to be good at.

I had my children keep their ripped paper in a small basket. When they were finished, I gave them ½ a piece of construction paper and encouraged them to make a picture. Their picture ended up more like a collage, but it was still a lot of fun. If you have older children, you might encourage them to rip around the images on the wrapping paper you provided them. For example, our paper had pictures of snowmen, snowflakes, candy canes, and Santa Claus. Children could practice ripping around those images without ripping through them and then glue them to the paper to make a scene. They might glue a family of snowmen with snowflakes falling around them and Santa Claus handing out candy canes. When finished, it would be fun to have your children turn their artwork into a story. Encourage them to write about what is happening.

http://rvclassroom.blogspot.com/2016/01/wrapping-paper-fine-motor-activities.html


Cutting

It’s not necessary, but the best paper to use for this activity is the paper that has the dotted lines for cutting on the back. If your wrapping paper does have the lines, encourage them to follow the lines across. Initially, Caleb wanted to cut straight and then turn to cut out each square. To make things easier, I taught him to cut all the way across in one direction and then cut the strip in the opposite direction to create the squares.

If your paper does not have the dotted lines, I recommend encouraging your children to cut around the images on the front. Have them cut out the snowmen or birthday cakes or dinosaurs. Again, you could have them paste the pictures to a piece of paper to create a scene that they can write about in their journals. If you wanted to do something different, you might have them create a pattern with the pictures that they cut out.

http://rvclassroom.blogspot.com/2016/01/wrapping-paper-fine-motor-activities.html

Hole Punching

Hole punching is tough for little hands, but with practice it can get easier. I can already tell my two are getting better and better, which means their little hand muscles are getting stronger and stronger! For our hole punching activity, I had my children cut the wrapping paper (that had dotted lines on the back) into strips of about 6 squares. Then, they used the hole punch to punch one hole in each square. This is good for learning one-to-one correspondence as well!

http://rvclassroom.blogspot.com/2016/01/wrapping-paper-fine-motor-activities.html


A fun activity for older children would be to have them roll a dice and then punch that many holes in the first square. Then, they would repeat the process for the other squares on the strip. From there, students could count or add up how many punches they made in all and compare their total to a friend’s to see who had more, less, or equal!

Do you have lots of extra wrapping paper? It’s a pretty cheap resource that you can use in many ways. Check out10 Creative Things to do with Wrapping Paper for more fun ideas to learn! Also, feel free to share what you do with others in the comments below or find me on Facebook or Twitter! I always love to hear from my readers!

God Bless You on Your Learning Journey ~

http://thelearningwagon.com/


HEY! Are you interested in more ways to practice fine motor skills with your children? Check out these great resources!


https://www.teacherspayteachers.com/Product/Scissor-Skills-2225349https://www.teacherspayteachers.com/Product/Glue-Practice-2297734

 
If you'd like all these, check out my Fine Motor Skills Bundle for a great deal!


https://www.teacherspayteachers.com/Product/Fine-Motor-Skills-Bundle-2409481


  You can find me at these great Link Ups!

Saturday, November 28, 2015

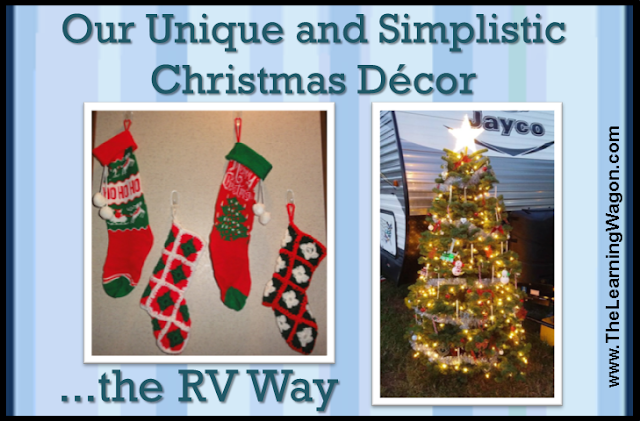
Our Unique and Simplistic Christmas Decor...the RV Way

http://rvclassroom.blogspot.com/2015/11/our-unique-and-simplistic-christmas.html


There is one thing you need for Christmas decorating that a camper is limited on…

1. SPACE!

You need storage space if you’re going to be traveling around with decorations.  Where are you going to keep ornaments, a tree, stockings, blow ups, nativities, and more? You need an area to put up your tree, stockings, and other decorations. 

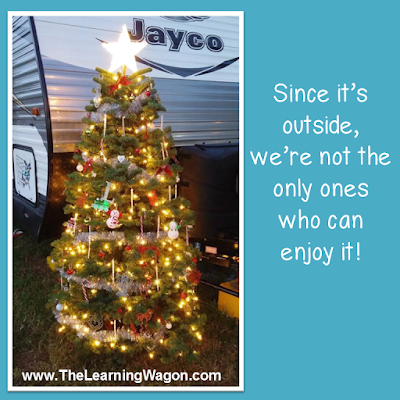
This is our third Christmas celebrated in our camper and our first in our upgraded camper. Even though we have more room, our living space is precious to us. Putting up a traditional tree inside the camper is out of the question. There’s no place we could put it that it wouldn’t be in front of or blocking something. We can’t rearrange the furniture like your house furnishings, so we decided to continue the tradition of putting up our Christmas tree outside in front of our camper. I like this placement better than putting it up inside anyway because now others can enjoy our decorations too. 

http://rvclassroom.blogspot.com/2015/11/our-unique-and-simplistic-christmas.html

Setting up a tree outside, isn’t for everyone. We’re in south Florida where the temperature has been in the 70s – 80s on Christmas. People celebrating Christmas with a three foot deep blanket of snow surrounding their camper probably don’t want to spend time setting up and decorating a tree outside, much less open Christmas presents outside. There are people that choose to put a Christmas tree inside. Some have pop up trees, but I believe most have small trees that usually go on the dining table.

http://rvclassroom.blogspot.com/2015/11/our-unique-and-simplistic-christmas.html

We buy a once-alive tree so we don’t have store a fake tree for the rest of the year. This year, we have an extra outdoor plug close to the front of the camper so we were able to light up the tree including our star topper. I love it! We haven’t done that in the past. All the ornaments I purchase (or make with the kids) are weather-proof and not fragile. I want my little ones to be involved in the decorating process and they like to decorate and redecorate many times before Christmas comes. Like I said before, we are loving the outdoor speakers. It was nice to sing along with beautiful Christmas songs while decorating our tree together. It’s a great way to get you in the Christmas spirit.

http://rvclassroom.blogspot.com/2015/11/our-unique-and-simplistic-christmas.html

Our Christmas tree is our main decoration outside, but we also have a small post that we hang seasonal flags on and a wreath on our door made from once-alive tree branches. Our first year, I bought giant clear plastic snowflakes that I hung from our awning with S hooks along with our large ball lights. I wish I had a picture of it, because it really was a pretty site, but it didn’t last long. Being in Florida, we can have very windy days. While you can tie down your awning, we’ve never felt comfortable doing that. We’ve seen way too many awnings break with a big enough wind gust, so we only put our awning out when there is little to no wind and put it up when wind speeds pick up. Thankfully, with our new camper putting the awning in is as simple as pressing a button! Since our awning is constantly being rolled out and in, adding decorations that you have to remove all the time isn’t for us. We talked about getting one of those blow ups of the RV where the door opens and a penguin pops out, but I chose not to for two reasons.

1. Our kids would think they are the blow ups that they get to jump on at those indoor playground areas and it would be a constant battle to keep them away from it. It’s hard enough to keep them out of other people’s yards and away from their decorations. They just get so excited and want to touch, touch, touch!

2. SPACE. I know they don’t take a lot of room, but it does take some and there are other things I’d like to save my space for. (like more books! Yes! I am a children’s book addict. I should attend Children’s Book Addict Anonymous!)

http://rvclassroom.blogspot.com/2015/11/our-unique-and-simplistic-christmas.html

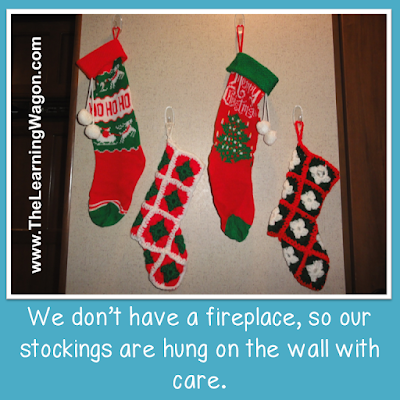
Inside, we used 3M hooks to hang our stockings on the wall. I also use 3M stickers to hang our artwork on the walks. Keep checking back to see more examples of our holiday themed learning and crafts! The only other thing I plan to add is a nativity set. In the past, I’ve had beautiful porcelain scenes, but I’m into making my life easier and adding breakable things my kids aren’t allowed to touch just doesn’t work for me. Don’t worry though, they get plenty of practice “Not Touching” other things, but we have enough of those. No reason to add any more. That said, I still want a nativity, so I’m looking at getting the Melissa& Doug wooden nativity for their room. I don’t mind if they play with it. In fact, if they do, it gives me a great opportunity to retell the story of Jesus’ birth, the reason for the season.

We’ve been fortunate to have good weather on Christmas day the last two years, so we’re hoping our streak continues. In the past, Santa has delivered our gifts right to our tree outside where we crank up the Christmas tunes while we begin the paper ripping process. If we have bad weather that makes this scenario impossible this year or in the future, Santa knows where the extra key is hidden so he can deliver the gifts inside. (wink, wink)

Remember, whether you’re in a house, apartment, or camper, there’s only one right way to decorate your home.


Have you been in the decorating spirit? I'd love to hear how you decorate your camper. Feel free to share your comments here below or find me on Facebook at The Learning Wagon!
God Bless You on Your Learning Journey ~

http://www.thelearningwagon.com/


You can find me at these great Link Ups!
Related Posts Plugin for WordPress, Blogger...