Isn’t the month of December a fun time to learn? The range of themes to choose from this time of year is numerous! You could focus on cultures with a “Christmas around the World,” theme or select a broad theme like “Winter”. I like to narrow down my theme each week. The themes I have planned for December are Christmas Trees, Snow, Gingerbread, The Nativity, and we have a Polar Express Day coming up soon.
This
week’s theme is Gingerbread, so I thought I would share a few activities that
we have been doing this week.
Gingerbread
Activities:
1. Read
Books
There
are so many fun Gingerbread themed books out there, it’s impossible to read
them all in a week (unless that’s all you did!). It would be fun trying, but
there are so many fun activities you can do with the books that it’s good to
take a break from reading occasionally. Our
first book to read was The Gingerbread Man, by Karen Schmidt.
2. Life-size Gingerbread Man Decorating
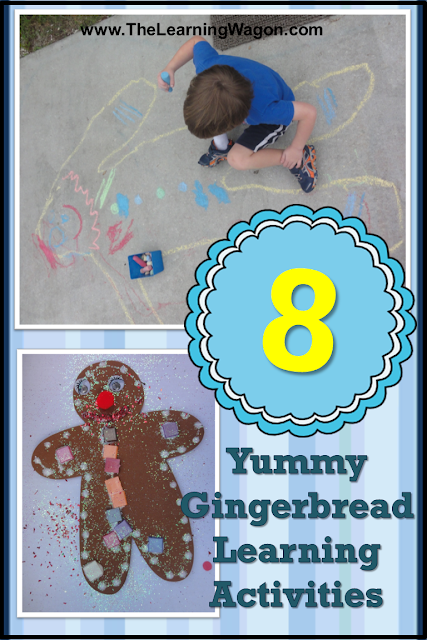
After reading the book, we used our vocabulary to describe what the gingerbread man looked like. Then, we took turns lying down on the patio to get traced with outside chalk, which made a life-sized gingerbread man. Then, we used the chalk to decorate our giant gingerbread man and girls.

2. Life-size Gingerbread Man Decorating
After reading the book, we used our vocabulary to describe what the gingerbread man looked like. Then, we took turns lying down on the patio to get traced with outside chalk, which made a life-sized gingerbread man. Then, we used the chalk to decorate our giant gingerbread man and girls.
3. How Many Gingerbread Men Tall are You?
I have foam gingerbread men that I got from a dollar store a couple of years ago. We used them as our measuring units to see how tall we were. First, Caleb laid down and Lily Anne placed the foam shapes from his feet to his head. He was 7 gingerbread men tall. Then, we measured Lily Anne. She was 5 gingerbread men tall. We talked about how Caleb was taller and that meant it took more gingerbread men to measure him. We looked at the two measurement columns of gingerbread men we created to see that some of Lily’s matched up to Caleb’s, but Caleb had 2 extra or 2 more gingerbread men than Lily did.
4. How Tall and How Wide is Your Gingerbread Man?
After measuring ourselves with gingerbread men, it was time to measure the foam cookies themselves. I provided pennies, small paperclips, large paperclips, and square plastic jewels that they used to measure the height of the gingerbread man. Then, we used those same items to measure the width of the gingerbread man. We talked about the following math vocabulary words: height, tall, width, wide, measure. We also compared the outcomes of our measurements using each material and talked about why the outcomes were different.

After measuring ourselves with gingerbread men, it was time to measure the foam cookies themselves. I provided pennies, small paperclips, large paperclips, and square plastic jewels that they used to measure the height of the gingerbread man. Then, we used those same items to measure the width of the gingerbread man. We talked about the following math vocabulary words: height, tall, width, wide, measure. We also compared the outcomes of our measurements using each material and talked about why the outcomes were different.
5. Roll and Splat Gingerbread Man Numbers
Next, we rolled giant dice and counted the number of dots on the dice. Then, the kids splatted BINGO dabbers on those numbers. This was a fast and fun activity!

6. Play Dough Gingerbread Man Decorating
We decorated gingerbread men several different ways today. During our sensory time, we decorated play dough gingerbread men. The kids used cookie cutters to cut their gingerbread man out of brown dough. Then, they used beads, wiggle eyes, plastic jewels, cut pieces of sparkly pipe cleaner and other items to decorate and redecorate!
7. Foam Gingerbread Man Decorating
We also decorated those foam gingerbread men that we used to measure earlier in the day. I provided the children with a variety of materials and let their creativity go crazy. It was a good time to practice our gluing skills too.

We also decorated those foam gingerbread men that we used to measure earlier in the day. I provided the children with a variety of materials and let their creativity go crazy. It was a good time to practice our gluing skills too.
8. Gingerbread Journaling
The last gingerbread man decorating activity we did was when they transferred how they decorated their foam gingerbread man to their journal. Even though I tried to encourage them to draw what they saw, (For example, if the gingerbread man had red buttons, the child should draw red circles on his gingerbread man) I didn’t want to stifle their creativity and I’m glad I didn’t. Caleb surprised me by drawing a picnic basket in the gingerbread man’s hand. We talked about how the gingerbread man was going on a picnic and what he was going to bring. Would it surprise you to know gingerbread men bring cookies on their picnic? After finishing his drawing, he decided he wanted to write the words “picnic basket” on his paper. We said the words together and determined that there were two words, so I drew 2 lines. Hind-sight 20/20, I should have drawn the lines longer. He stills writes his letters very large, but we squished them in. He impressed me with his letter knowledge. I helped sound out the words and he listened and wrote the sounds he heard.

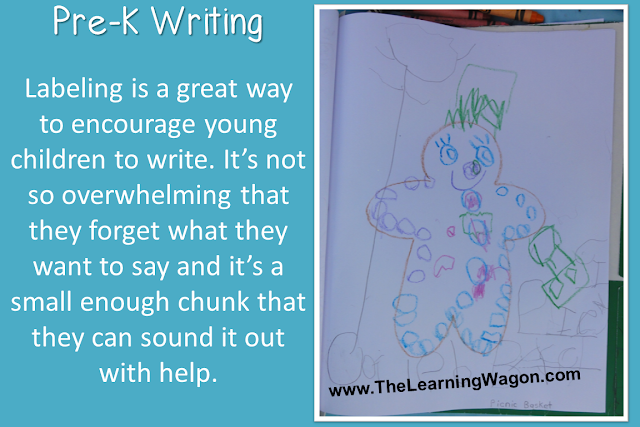
The last gingerbread man decorating activity we did was when they transferred how they decorated their foam gingerbread man to their journal. Even though I tried to encourage them to draw what they saw, (For example, if the gingerbread man had red buttons, the child should draw red circles on his gingerbread man) I didn’t want to stifle their creativity and I’m glad I didn’t. Caleb surprised me by drawing a picnic basket in the gingerbread man’s hand. We talked about how the gingerbread man was going on a picnic and what he was going to bring. Would it surprise you to know gingerbread men bring cookies on their picnic? After finishing his drawing, he decided he wanted to write the words “picnic basket” on his paper. We said the words together and determined that there were two words, so I drew 2 lines. Hind-sight 20/20, I should have drawn the lines longer. He stills writes his letters very large, but we squished them in. He impressed me with his letter knowledge. I helped sound out the words and he listened and wrote the sounds he heard.
I found several of these activities and more on Pinterest. You can find more Gingerbread themed learning activities by visiting and following my Gingerbread Board!
Are
you having fun with a gingerbread theme? Feel free to share what you do with
others in the comments below or find me on Facebook or Twitter! I always love
to hear from my readers!