

I’m
late sharing this… but I didn’t get it up until last minute myself. We don’t
usually do Advent Calendars, but this year I wanted to try it. We’re actually
doing two. One is a scripture based reading that a friend shared with me. You can
find more information about it by CLICKING HERE. The second is the fun
Countdown Advent that I made and we put up together.
Each
day we count down the days by turning a Christmas light number around and then
my children receive a book with a Christmas or winter related topic that we
read together.
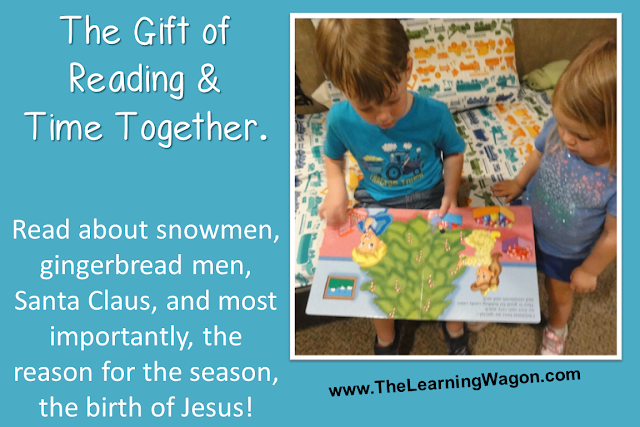
The
first thing I did was pull out of my stash 25 books to wrap. I wrapped books
about snowmen, gingerbread men, Christmas trees, Christmas morning, and Santa
Claus, but the most important books are those about Jesus, the reason for the
season. I kept a permanent marker close by as I wrapped so I could write the
title of each book on the outside of the wrapping paper. This time of year,
themes pop up in our weekly learning. For example, our theme this week was
about Christmas trees, next week is snowmen, the following week is gingerbread
men, and the week of Christmas is the birth of Jesus. With that in mind, I
ordered my books so that my children would open a book that related to our
theme for the week and stacked them so I could just grab the top book to give
them each day. After wrapping all these books, you could create a decorative
piece like the Christmas tree shaped stack found HERE, but I just stuck mine in
a cabinet. If I left them out, I knew they wouldn’t stay wrapped very long. All
it would take is a trip to the bathroom for me and they’d have wrapping paper
under their fingers!

Countdown
Christmas Advent Calendar
Directions
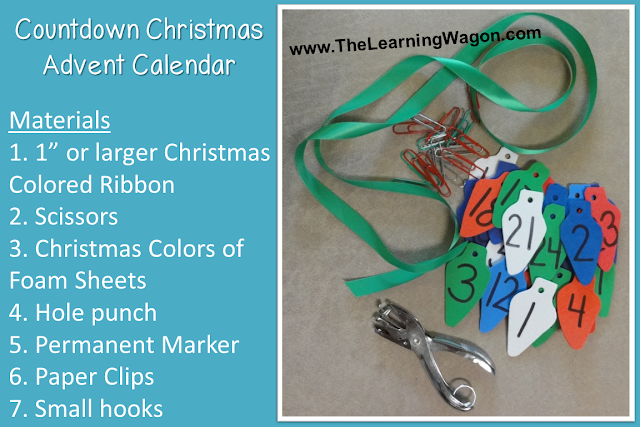
1.
Cut out 25 Christmas tree lights from foam shapes. Mine are about 2.5” L X 1.5”
W. Once I cut the first light, I used it as my pattern for the 24 others. I
used foam from my scrap pile so I wasn’t able to do a pattern with the colors,
but could be an option for you.
2.
Write one number on each Christmas light from 1 – 25 as large as you can using
a permanent marker.
3.
Make a hole at the top of each Christmas light.
4.
Lay all the lights out in order on the ground and measure how long your ribbon
needs to be. Add about 2” extra of ribbon on each side. Also, make sure your
Countdown Advent Calendar will fit in the location you had picked out. I didn’t
have an area large enough to fit our Countdown Advent Calendar, so I made two
rows by cutting my ribbon in half.
5.
Fold each end of your ribbon in about ½” and using your scissors cut a tiny
slit. This will allow you to slide the ribbon onto the hook for hanging. Since
I had two ribbons, I had to cut four slits. If you’re going to hang the ribbon
as one piece, after cutting one slit on each end, I would fold the ribbon in
half and cut a third slit so there is not too much slack in the ribbon once you
put all the lights on.
6.
I used 3M hooks to hang our ribbon. I slid the ribbon onto the hooks, stuck one
side to the wall, eye-balled the ribbon to be level, and stuck the other hook
to the wall. Since I had a second row, I put a paper clip onto the middle of
the first ribbon and place a Christmas light on the clip to give me an idea of
how low it would hang and where I should place the second ribbon. Then, I
repeated the process to hang the second ribbon below the light.
7.
I didn’t have enough paper clips of one color, so I decided to create a
pattern. I had my children sort the three colors I chose to use. Then, I asked
them to hand me a certain color paper clip to hang on the ribbons. Once we got
started, they told me what color went next. I made sure to slide the paperclips
on the ribbon the same way each time. For example, I slide the small side of
the paper clip to the back of the ribbon and the open side of the paper clip
was on the right side. It looks neater this way and it made it easier on the
kids when they placed the lights on the clips to keep them all facing one
direction. Older children could slide the paper clips onto the ribbon
themselves.

8. Next, I placed all the lights number side up. My children took turns finding the numbers and placing them on the paper clips. All I did was pull the open end of the large side away from the paper clip a little bit so it was easier for them to slide the hole of the light down onto the paper clip. If the kids put the lights on with the number side going on first, the numbers all faced forwards. When a day has passed, the kids take a number off and flip it over so that the blank side goes on first and the number faces the wall.

9.
Last we open our book and read it together. It’s fun activity that gets us in
the spirit of the holiday! I hope you enjoy it too!
Do
you use an Advent Calendar? DIY or bought? Feel free to share what you do with
others in the comments below or find me on Facebook or Twitter! I always love
to hear from my readers!

This is such a fun idea, and I love how it can be turned into a family project/fine motor skills practice.
ReplyDeleteThanks for linking up with The Alder Collective! Your post has been pinned to our group board. We're taking a break for a couple weeks, but we hope you'll come back to link up with us on January 5!
I'm glad you enjoyed it!
ReplyDelete