Sunday, January 26, 2014

In the Name of Love...


Here’s an activity that was very simple, but Caleb has enjoyed it repeatedly…

http://rvclassroom.blogspot.com/2014/01/in-name-of-love.html


Materials:
Construction paper
Glue
Scissors
Laminator 

Set-Up Directions:
1. Cut out 2 copies of each letter in your child’s name from the construction paper.


2. Cut out small hearts that will fit on the letters you just cut. (You can skip this step if you choose to use small heart stickers instead.)

3. Glue 1 copy of letters to a sheet of construction paper in the order of your child’s name.

4. Glue or stick one small heart to each letter.  I alternated gluing the hearts at the top and bottom of each letter to remove any confusion. Make sure that you glue the hearts in the same location on matching letters. This is done for two reasons. First, it shows your child which side is the front of the individual letters. Second, it shows your child which way is right-side-up. This seems redundant being that the letter itself is right-side-up, but my son has played similar games in the past where he will match the letters correctly, but without this cue they were placed upside-down right on top of the matching letter. The visual discrimination is not there yet. He did not have any problems matching the letters correctly once I directed him to use the hearts as a guide. 

5. Laminate the name paper and the individual letters for durability. Then, cut out the individual letters. 

Ways to Play:
1. Hand your child a letter as you say that letter’s name. Have your child place it on the matching letter in his/her name.

2. Place the letters in a bag. Have your child pull out a letter. Say, “You pulled out the letter C!” Have your child place it on the matching letter in his/her name.

3. Place the letters in a bucket. Cover the letters with sand, rice, heart confetti, or a different medium. Have your child sift through the medium to find each letter. When your child finds a letter, name it for him/her. Have your child place it on the matching letter in his/her name.

4. Place all the individual letters on a table and mix them up. Point to the first letter in your child’s name on the paper and ask your child to find the letter you name. 

5. To build fine motor skills, add some play dough into the game. Have your child pull dabs of play dough and place them on the first letter to cover it. Then, have your child place the individual letter on top of the play dough like a sandwich. 

It’s beneficial for your child to play the same game repeatedly, but keep the engagement of your child high by adding novelty to the game when you see interest beginning to fade. Do you have any other suggestions to keep the novelty appealing?

God Bless your Learning Days,


Wednesday, January 22, 2014

Beach Learning: Exciting Young Minds to Engage, Explore, & Enjoy


This blog post is dedicated in loving memory of Uncle Bob, a larger than life character who filled our hearts with love and laughter. We will miss you!

http://rvclassroom.blogspot.com/2014/01/beach-learning-exciting-young-minds-to.html

Our family quickly packed our bags this weekend and headed to Daytona Beach, Florida to be with, comfort our loved ones and grieve together. During this time, Caleb and I took a few walks on the beach together. While he’s been to the beach dozens of times, he’s at an age now where he’s starting to take interest in the sounds he hears and the sights he sees. His curiosity lifted my spirits and together we were excited by the sensorial experiences  offered by the beach. 

This same beach has been a vacation stop ever since Andy and I got married 12 years ago. I’ve always enjoyed collecting shells during each visit to share with my classroom kids, but this trip was different. The sizes and shapes of the shells that scattered the beach were unlike what I’ve seen in the past. My own excitement for seeing such unique and beautiful shells was the trigger that encouraged Caleb to become engaged in this beach exploration. We started out just by collecting different shells that caught our eye. It brought me joy to hear his excited voice shouting, “Look Mommy!” 


We  were collecting shells here and there when I heard him say, “What’s in there?”  I looked and saw him leaning over a crab hole to see inside. This lead into a discussion about crabs and why we don’t put our fingers in holes.  


As we were walking along the beach, I pointed down to a footprint made in the sand by a large dog and asked Caleb what made this shape in the sand. I reminded him of the large dog we had just seen pass us. Then, he found one that was smaller. We talked about how this must have been a different dog. A dog smaller than what we had seen earlier. 

Caleb noticed some birds scurrying around between waves. As we got closer to the birds, we commented on all the footprints they were making in the sand. At that point, I saw it click. He began walking behind me noting, “Mommy footprints.”  Then, he looked behind himself as he walked to spy his own footprints created as he walked in his boots.  During our second trip, he wore tennis shoes, which was another fun discovery for him.


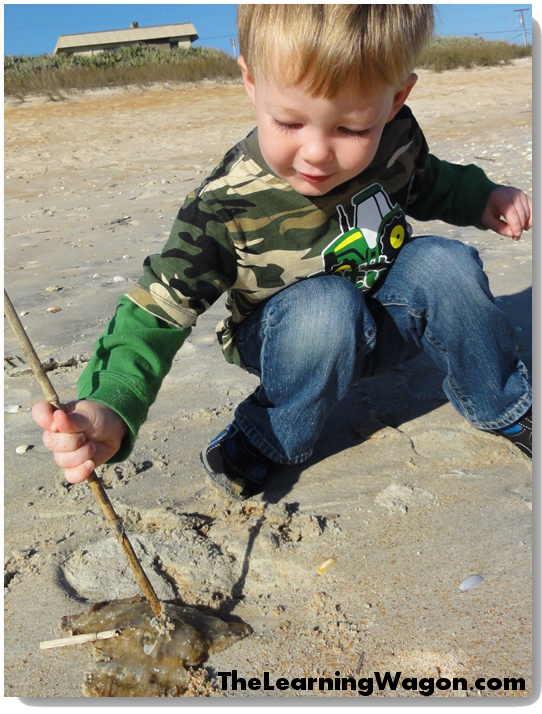
On this trip, we found several bird feathers, a jelly fish, a sand dollar and a shell that we analyzed for a long time because even Mommy had never seen one quite like it. As we were walking, I noticed a shell that had just recently been washed ashore fresh from a wave. It was a beautiful iridescent color with a thin shell. I picked it up to move it away from the waves and as I was setting it down we both heard some crackling. I placed it in the sand where we spotted that the shell had open up a little. We could tell with the sunlight shining through the back that something was moving inside so it must be alive. Since it was still alive, we decided the best thing to do was throw it back into the ocean. Once I got home and posted a picture on Facebook, I had a friend share that this was a Pinnidae or Pen Shell, which is a large saltwater clam. 


In the midst of sorrow, we can find hope and joy in the world that God created.
* We became excited by  the experiences the beach offered us.
* We were engaged in our exploration by the beauty, novelty and rarity of the objects we observed.
* We enjoyed our time learning and our time together as mother and son.

God Bless your Learning Days,

Monday, January 6, 2014

Calendar Time


http://rvclassroom.blogspot.com/2014/01/calendar-time.html
I wasn’t planning to start this quite this early, but Caleb has had a great deal of interest in knowing what day it is and learning the days of the week. We’ve been singing the Days of the Week song to the tune of The Adams Family which he thinks is very funny. We talk to him about things that are happening today and what is coming up on different days later in the week. It’s hard to really explain what a day is since it is abstract, but I can see the wheels turning as he’s trying to wrap his brain around it. 

He has learned that when the sun comes up it is day-time and he reminds of every morning as he runs to our bed to wake us up at first light shouting, “It’s day-time!” He understands that when it gets dark and we see the moon and the stars on most nights, “It’s night-time!” He is beginning to learn that different days have names and has attached a few routine activities to those days like that on Sunday we go to church. 

Since he has had so much interest in this topic, I decided to begin a short Calendar lesson with him each morning. I’m keeping the lessons short as I don’t want to bore him and turn him of from learning more about it. 

Below are the concepts/activities I’m focusing on right now:
 
* Months of the year names: We sing a song.
* Days of the week names: We sing a song.
* Counting: We count up to the number of the date.
AB Patterning: I have cut out diamonds and rectangles of the same color and placed them in a bag. I chose these shapes because he has not mastered them yet, but is familiar with them. Each day we place a shape on the box of the date for that day in diamond-rectangle order. I have him say the pattern order aloud.
Today is… : Based on his engagement in the activity for the day, we will talk about what is the name of the day and what we plan to do that day.
 
As long as his interest stays strong in this activity, I plan to slowly add new concepts one at a time as he masters ones we have been working on. I don’t plan to take any away, but I might change them up to keep his interest high so he doesn’t get bored with this learning time. 

Some concepts/activities I will introduce later include:
 
* Say the whole date for that day: I have written the year on the calendar already, but we haven’t explained it because he’s not ready yet. When he is, each day we will say, “Today is… January 1, 2014.”
* Identifying his birthday month: As we sing the Months of the Year song, I will have him jump up and shout his birthday month.
* Increase challenge of AB pattern: I will begin asking him which shape comes next, what shape will Thursday be, what will be the next 2 shapes.
* Introduce more complex patterns: Once he masters AB patterning with different shapes and objects, I will change the pattern to AAB, ABB, AABB, ABC and so on.
* Once he has learned to count well, at the end of the month, we will start taking off the pattern shapes counting backwards.
* Calendar parts: I will ask him to show me where the month is written on the calendar, where the days of the week are, where the year is written, how many Saturdays there are this month.

These are some of the skills I taught my kindergarteners in the classroom. Obviously, we have a few more years before I start challenging him with these questions, but I wanted to put them out there as they might give you some ideas of how to help your child understand and use a calendar. 

God bless our learning days all year through!


Thursday, January 2, 2014

10 Creative Things To Do with Wrapping Paper

Now that Christmas is over, you have 2 choices... 

1. You can store away all your extra wrapping paper until next year.

2. You can use it for fun and educational experience all year! 

http://rvclassroom.blogspot.com/2014/01/10-creative-things-to-do-with-wrapping.html

If you don't have any wrapping paper, this is also a great time to buy it on the Clearance shelves. I recently went to the discount store and found a great deal on wrapping paper. It’s not too hard to do. When I’m looking to buy wrapping paper, I look for  the below components in this order.


1. Price ( I really don’t like to spend more than a dollar…yes, I’m cheap! I mean, Frugal!
2. How much is on the roll (obviously, the more the merrier!)
3. The thickness of the paper – Some rolls are super thin and while it will work if that’s all you can find, it’s best to get a thick sheet.
4. Last… the design.

Wrapping paper can be used in so many ways and I keep seeing the benefits of keeping a roll around! 

Wrapping paper ideas:

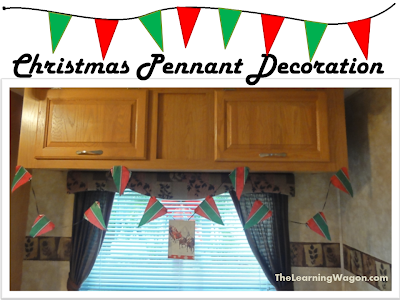
1. Holiday Pennant Decoration - I know this is coming late for Christmas, but I wanted to share our festive RV decorations! Plus, you can do this for any holiday based on the design on your wrapping paper. All I did was cut out triangles and attached them with a piece of tape and ribbon. We hung our Christmas cards on them as we got them, which made it even more fun!


 2. Free coloring! - As long as you don't buy the roll of paper that is double sided, wrapping paper is usually white on one side. Give your child some crayons, markers, or colored pencils and let him or her let the creativity flow!


3. Bulletin Board Cover - Wrapping paper is festive and colorful. You can easily use it to cover your bulletin board for the holidays. Extend its usage through January by purchasing winter scenes with snowflakes and snowmen.

4. Art Canvas or Art Drop Cloth - The picture below shows my son hand painting on the back side of wrapping paper, but I often pull out wrapping paper to cover our workspace when we are using glue and other messy mediums. Usually after we are finished with our project, I will let him free draw on the paper.


5. Photo Backdrop - The picture below was actually taken with a vinyl table cloth, but wrapping paper would make a beautiful backdrop to a photo opportunity with your child too!


6. Transportation Map for cars, trains, and boats - You can make this as simple or as complex as your artistic abilities will take you. All you have to do is draw the biggest circle on the wrapping paper as you can fit. Then, take two of you child's vehicles and draw another circle on the inside of the first. Add any additional details like yellow lines, trees, stop signs, a lake for boats, barns for the animals, etc. Typically the wrapping paper is too wide to run through the personal-use laminator so if you intend to use the map more than once, I recommend using shipping tape all the way around the edges to prevent rips. You could easily fold this up and store for later use.


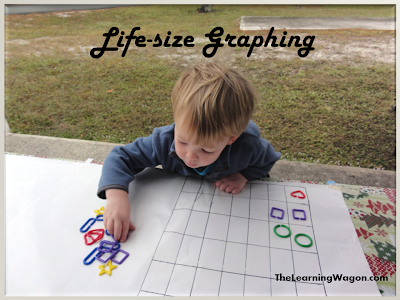
7. Life-size graph - If you're graphing something small like the links seen in this picture, you can either draw a grid pattern to fit the shapes like I did or you can use wrapping paper that has a cutting grid already marked on the back. You can create bigger grid graphs to graph shoe styles, toy types, or even boys and girls in your family!


8. Handprint Ornament - This is another Christmas one, but if you like it you can just be ready for next year. I traced Caleb and Lily's hands on the wrapping paper and cut each out. I took a cute picture of Caleb and Lily wearing reindeer antlers. Then, I printed the pictures out in a heart shape, cut them out, and glued them to the decorative side of the wrapping paper. On the back, I wrote each child's name and year.

9. Wrapped Up Sensory Bin - This year, I wrapped several extra ornaments and had Caleb unwrap them. Next year, I'm going to incorporate this bin with decorating the Christmas tree. Each day I'm going to wrap 5 - 6 ornaments for Caleb to unwrap and use to decorate the tree. I added the picture of him placing the trash in the can because it is never to early to teach them to clean up.


10. Life-size Game - This could really take any form from a life-sized board game to a card game. I took a scrap piece of wrapping paper and drew giant shapes on it. I put some blocks in a large hat. I told Caleb the name of a shape and he pulled out a block and placed it on the shape I said. At the end we counted the blocks that were on each shape and talked about how some had more, some had less, and some had equal. Since he did such a great job, he got to wear the hat at the end of the game. 

I also love playing life-size board games with wrapping paper. All you have to do is roll out a large sheet and draw squares around the edges. Write start in one square and finished in another. Show your child a number to name, a sight word to read, or have them copy a clap-hand-slap pattern in order for them to move from one space to the next. Be creative and have fun!


Have a blessed learning day!


Related Posts Plugin for WordPress, Blogger...